Overview of remote desktop access
You can use your home computer or laptop to log in from off-campus to your USC work computer. This is called remote access, and it has several advantages. You can:
- Access files and software that are available on your USC computer,
- Make sure USC data stays on USC computers, and
- Receive support from our Help Desk, who can remote in to your USC computer to troubleshoot.
If this is your first time setting up your work computer for remote access, before you begin working from home our guide below will walk you through setting up your work computer in person.
Remoting into your work PC
Remoting into your work PC from your personal PC
Quick guide
Step 1. Set up your work PC
- Look up your work PC's name:
- In the Start menu search bar, type "This PC"
- Click on Properties (last option on the bottom right).
- Copy down the Full computer name (example.dts.usc.edu).
- Make sure that sleep/hibernate is set to Never, and leave your work PC on.
Step 2. Set up your personal PC
- Connect to the USC network from off-campus via VPN.
- Check whether you have Remote Desktop Connection installed:
- Type "remote" into the Start menu search bar.
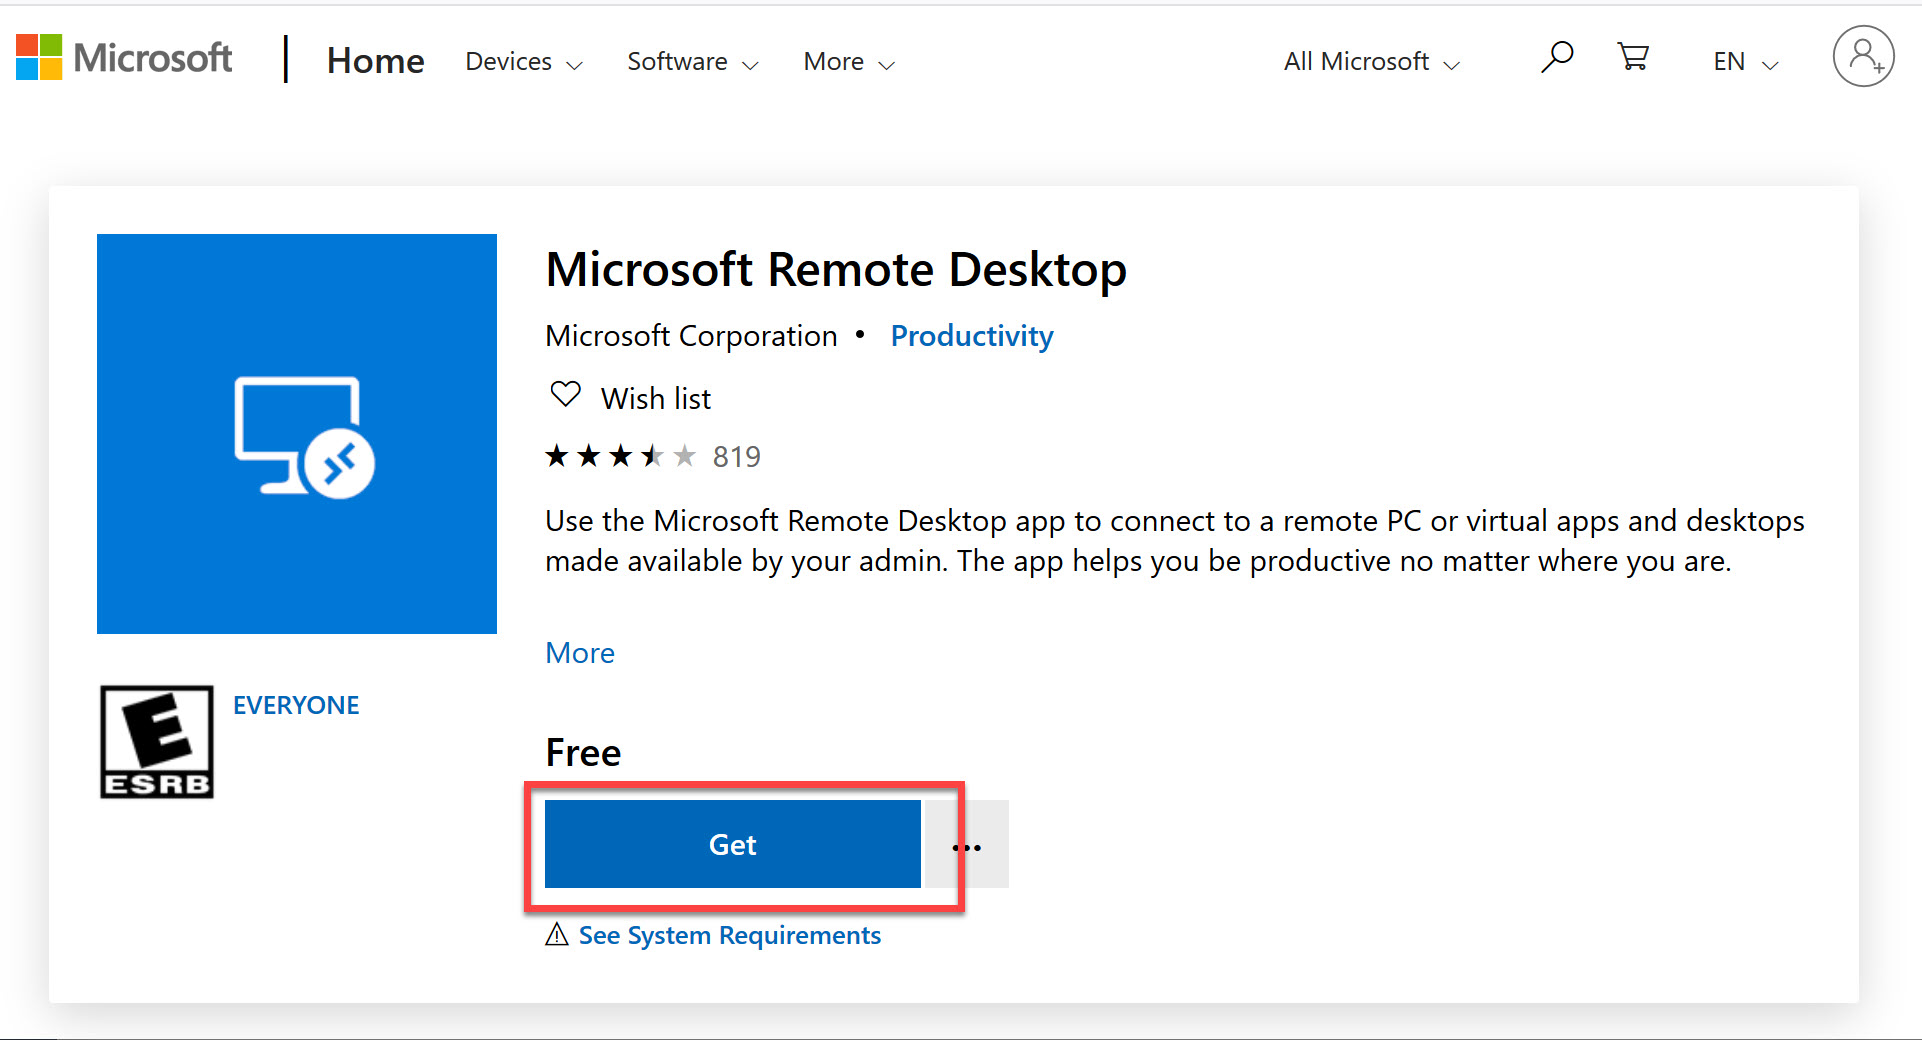
- If Remote Desktop Connection does not appear, download and install Microsoft Remote Desktop.
Step 3. On your personal PC, log in to your work PC
If you already had Remote Desktop Connection:
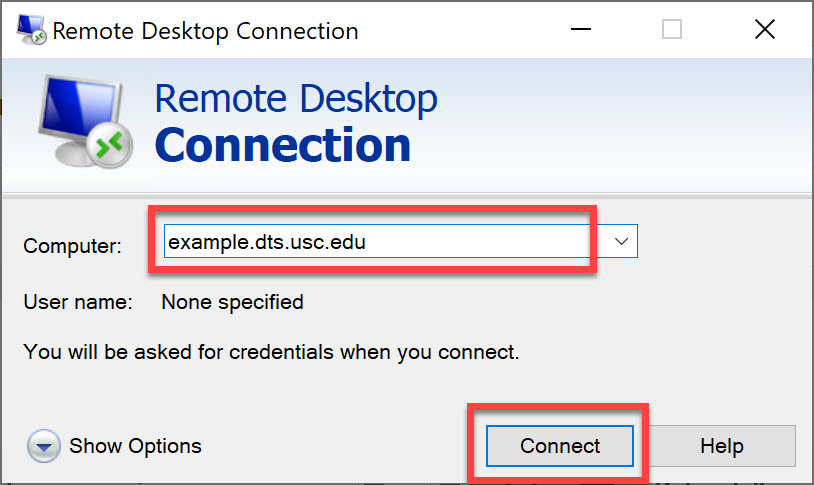
- On your personal PC, open Remote Desktop Connection.
- Type in your work PC's name (example.dts.usc.edu from Step 1.1 above) and click on Connect.
- Type in your Dornsife account credentials and click on OK.
-
User name: DTS\yourusername
-
Password: yourpassword
- If a security certificate warning displays, select Don't ask me again for connections to the computer and click on Yes.
- You're all set!
Otherwise, if you had to download and install Microsoft Remote Desktop instead:
- On your personal PC, open Microsoft Remote Desktop.
- Click on + Add, and then click on Desktop.
-
PC name: example.dts.usc.edu (from Step 1.1 above)
-
Display name (optional): My USC Desktop (or type any other name you like)
- Click on Save.
- An icon appears with the name you created. Click on the icon.
- When requested, input your Dornsife credentials and click on Connect.
-
Username: DTS\yourusername
-
Password: yourpassword
- You're all set!
Detailed guide (with screenshots)
Step 1. Set up your work PC
- Look up your work PC's name:
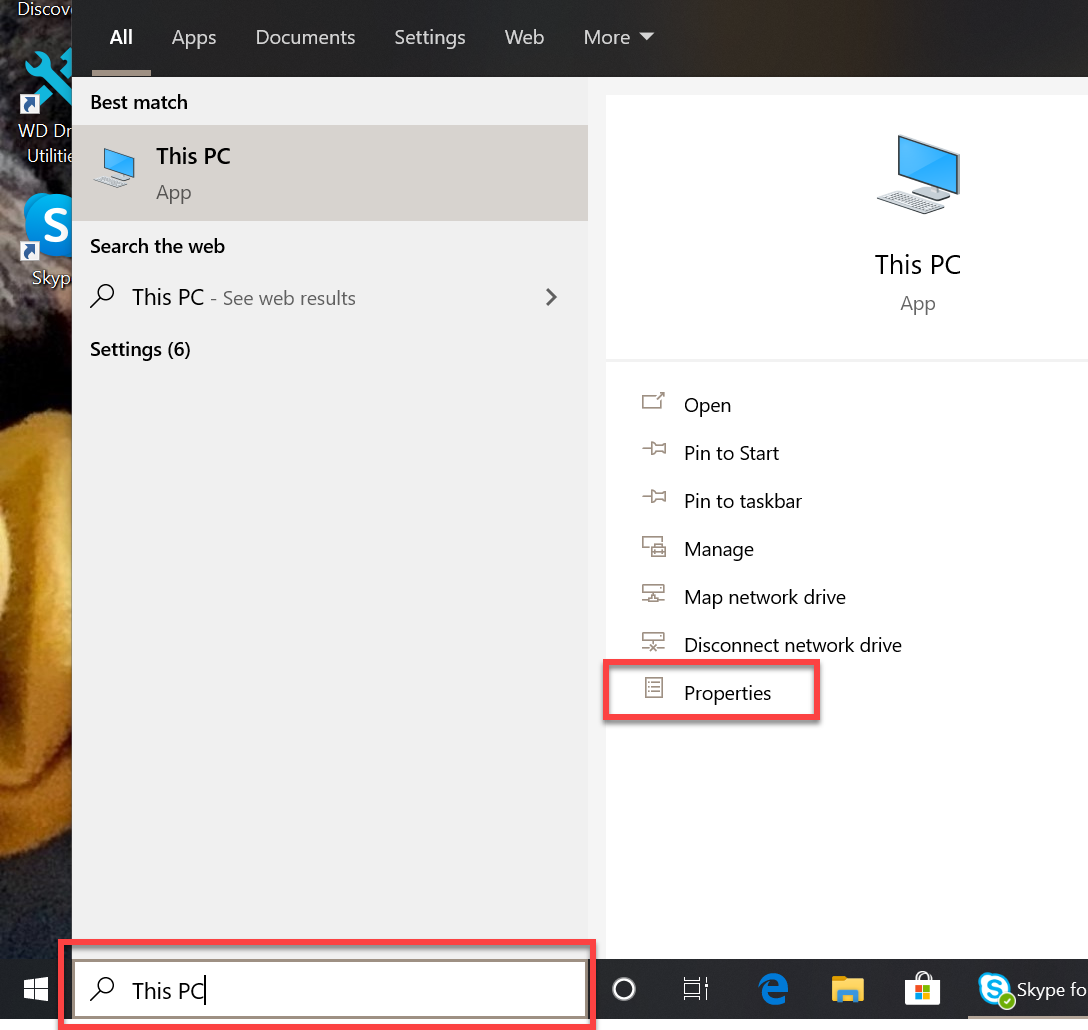
- In the Start menu search bar, type "This PC"

- Click on Properties (last option on the bottom right).
 >
>
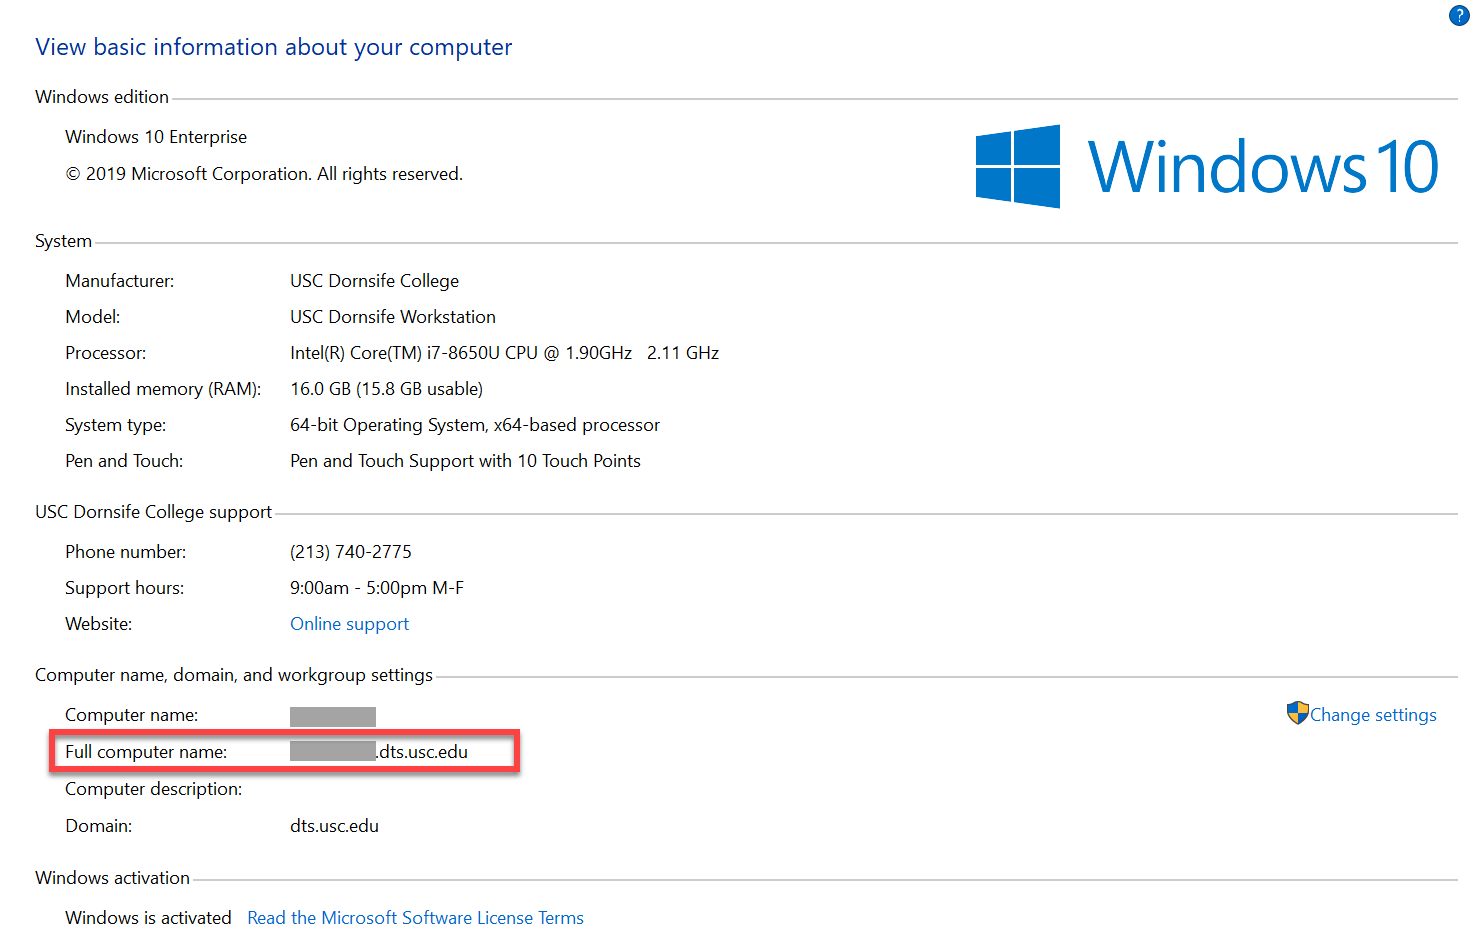
- Copy down the Full computer name (example.dts.usc.edu).
- Make sure that sleep/hibernate is set to Never, and leave your work PC on.
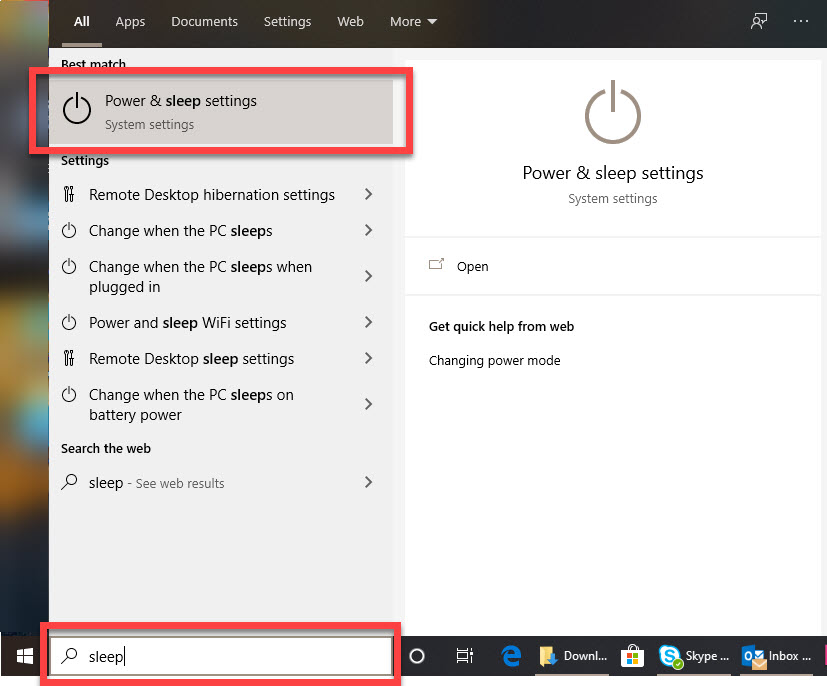
- In the Start menu search bar, type "Sleep"

- Click on Power & sleep settings.
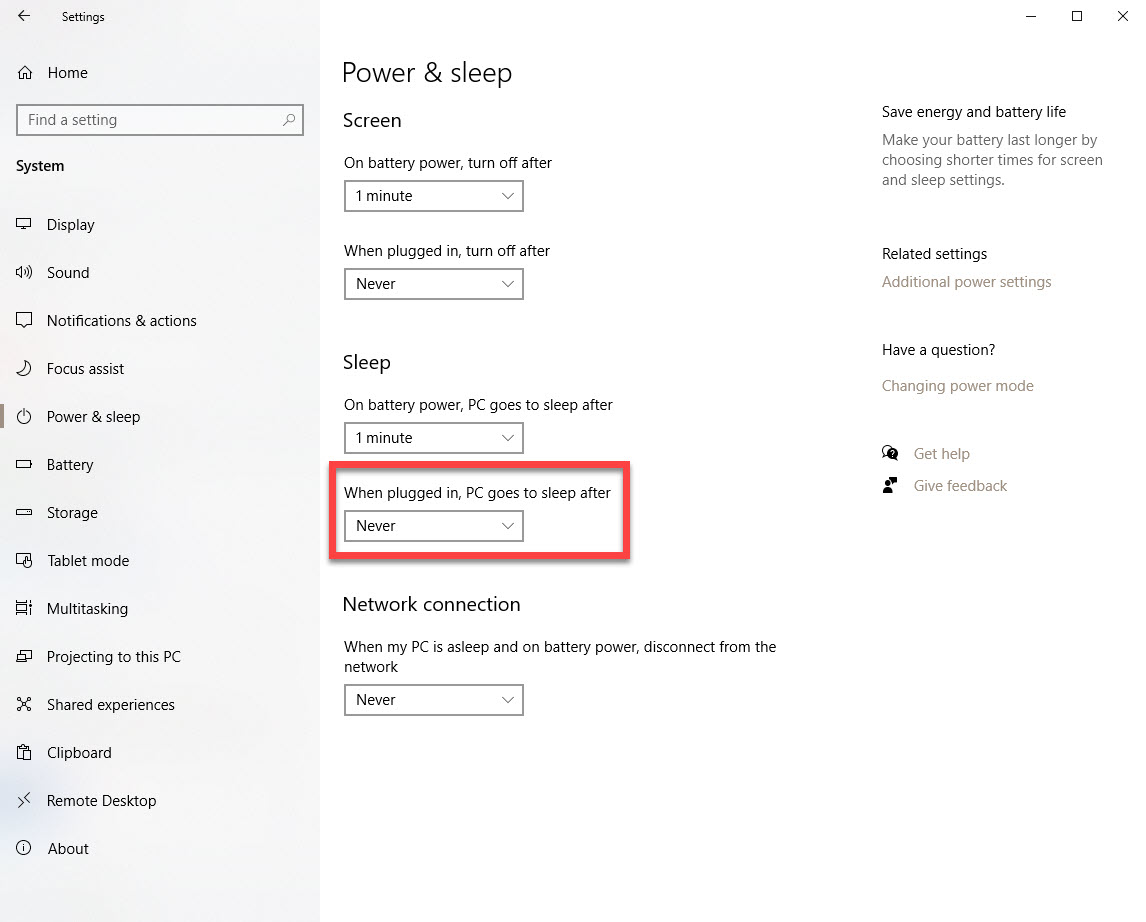
- Make sure that Sleep is set to Never.
Step 2. Set up your personal PC
- Connect to the USC network from off-campus via VPN.
- Check whether you have Remote Desktop Connection installed:
- In the Start menu search bar, type "remote" and Remote Desktop Connection should appear.
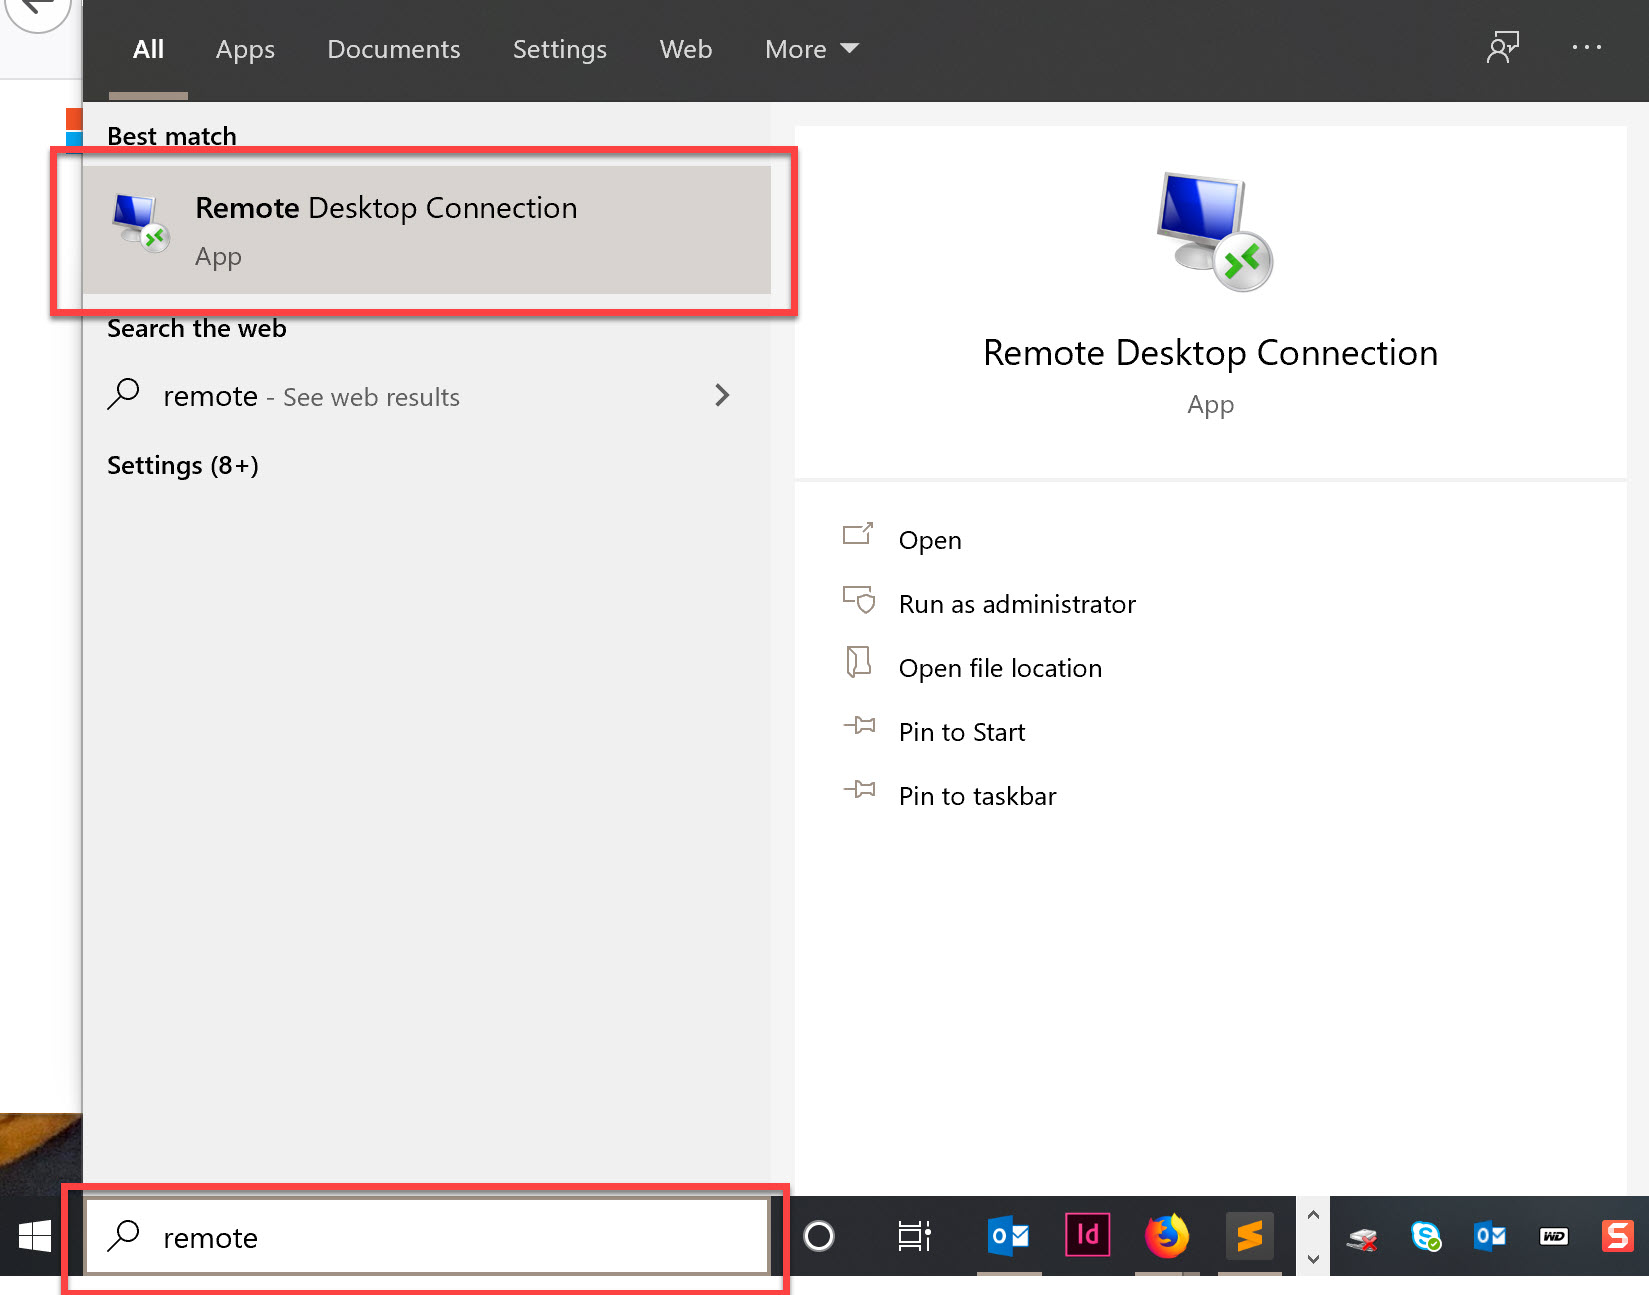
- If Remote Desktop Connection appears on your screen, you can go to Step 3 below.
- If Remote Desktop Connection does not appear on your screen, you will first need to download and install Microsoft Remote Desktop.
Step 3. On your personal PC, log in to your work PC
If you already had Remote Desktop Connection:
- On your personal PC, open Remote Desktop Connection.

- Type in your work PC's name (example.dts.usc.edu from Step 1.1 above) and click on Connect.
- Type in your Dornsife account credentials and click on OK.
-
User name: DTS\yourusername
-
Password: yourpassword
- If a security certificate warning displays, select Don't ask me again for connections to the computer and click on Yes.
- You're all set!
If you had to download and install Microsoft Remote Desktop instead:
- On your personal PC, open Microsoft Remote Desktop.
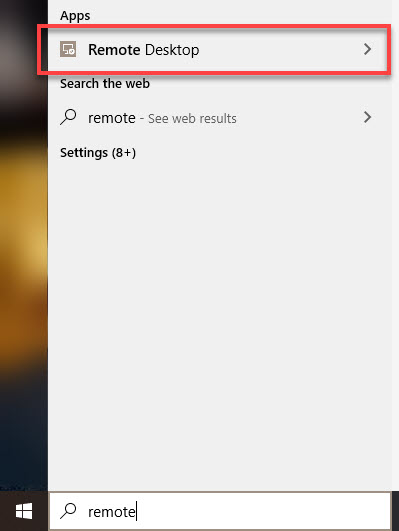
- Click on + Add.
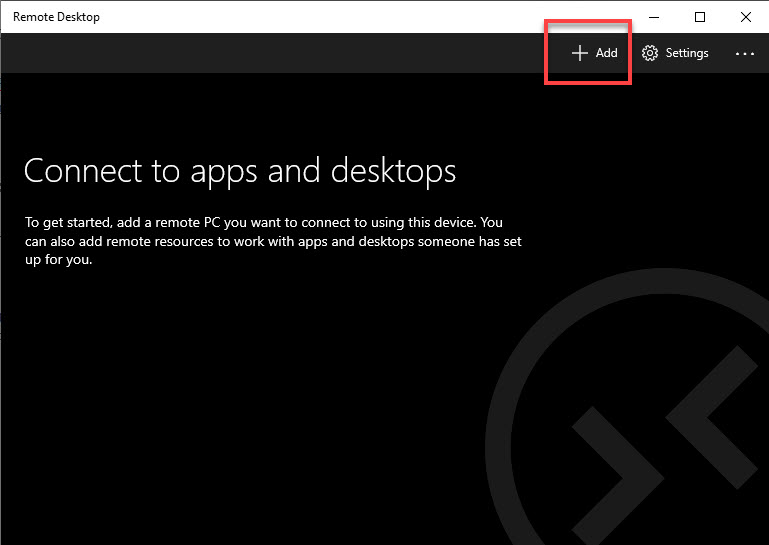
- Click on Desktop.
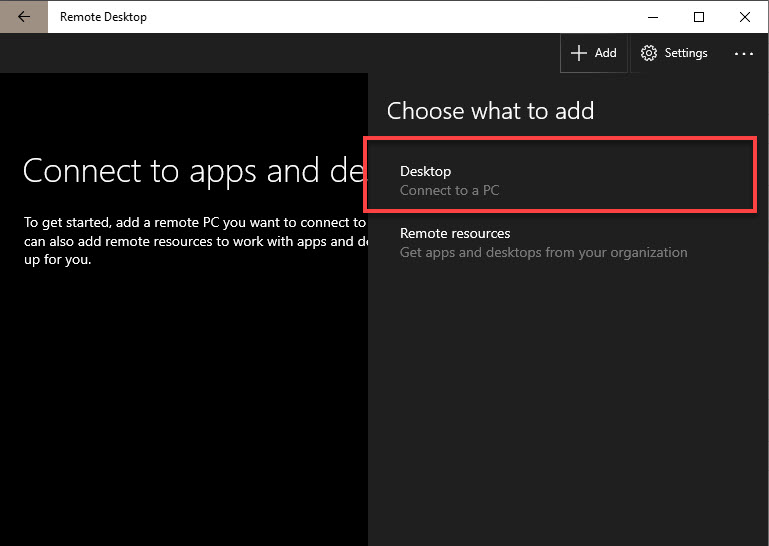
-
PC name: example.dts.usc.edu (from Step 1.1 above)
-
Display name (optional): My USC Desktop (or type any other name you like)
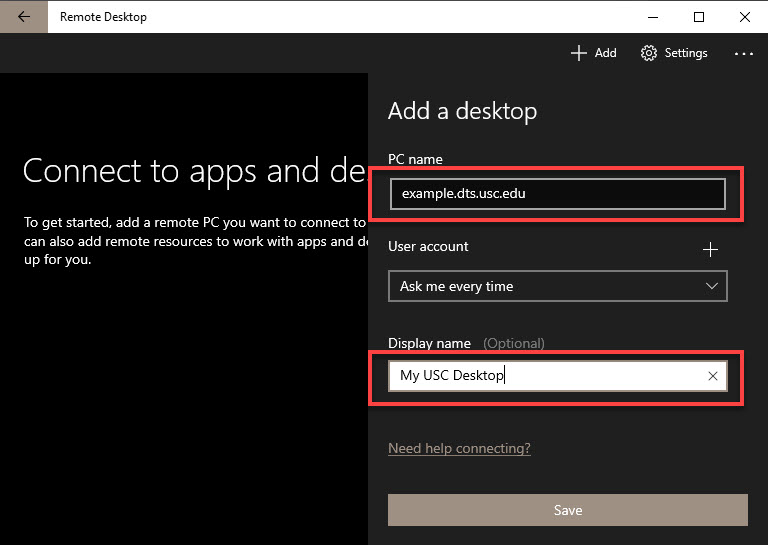
- Click on Save.
- An icon appears with the name you created. Click on the icon.
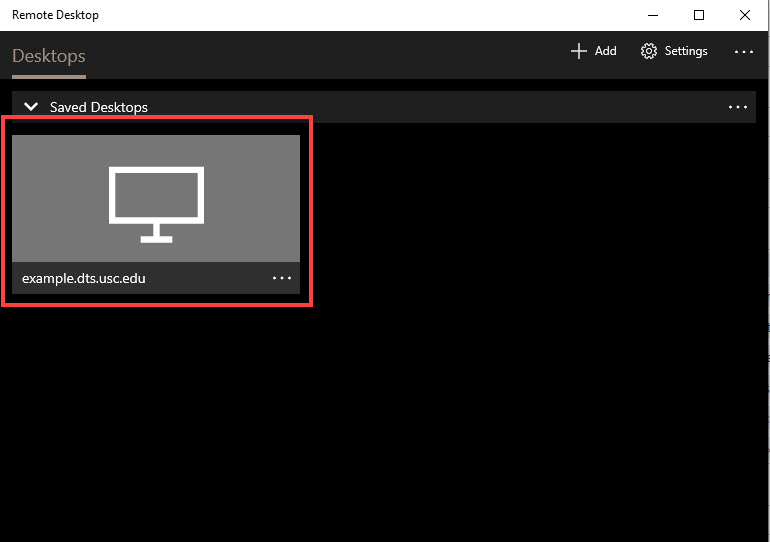
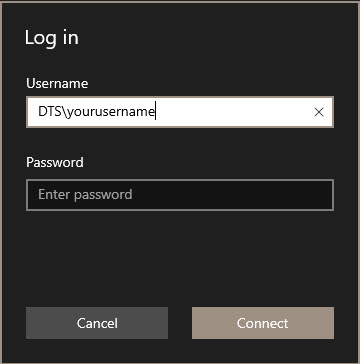
- When requested, input your Dornsife credentials and click on Connect.
-
Username: DTS\yourusername
-
Password: yourpassword
- You're all set!
Remoting into your work PC from your personal Mac
Quick guide
Step 1. Set up your work PC
- Look up your work PC's name:
- In the Start menu search bar, type "This PC"
- Click on Properties (last option on the bottom right)
- Copy down the Full computer name (example.dts.usc.edu)
- Make sure that sleep/hibernate is set to Never, and leave your work PC on.
Step 2. Set up your personal Mac
- Connect to the USC network from off-campus via VPN.
- Download and install Microsoft Remote Desktop Connection for Mac from the App Store.
Step 3. On your personal Mac, log in to your work PC
- On your personal Mac, open Microsoft Remote Desktop.
- Click on Add PC. Alternatively, you can instead click on the + icon and select Add PC.
- Update the following fields:
-
PC name: example.dts.usc.edu from Step 1.1 above
-
User account: Click on this field and select Add User Account…
- Type in your Dornsife account credentials and click on Add
-
User name: DTS\yourusername
-
Password: yourpassword
-
Friendly name (optional): Type anything you like, e.g. My USC Desktop
- Click on Add.
- An icon appears with the name you created. Double click on the icon.
- If a security certificate warning displays, click on Continue.
- You're all set!
Detailed guide (with screenshots)
Step 1. Set up your work PC
- Look up your work PC's name:
- In the Start menu search bar, type "This PC"

- Click on Properties (last option on the bottom right).
 >
>
- Copy down the Full computer name (example.dts.usc.edu).

- Make sure that sleep/hibernate is set to Never, and leave your work PC on.
- In the Start menu search bar, type "Sleep"

- Click on Power & sleep settings.

- Make sure that Sleep is set to Never.

Step 2. Set up your personal Mac
- Connect to the USC network from off-campus via VPN.
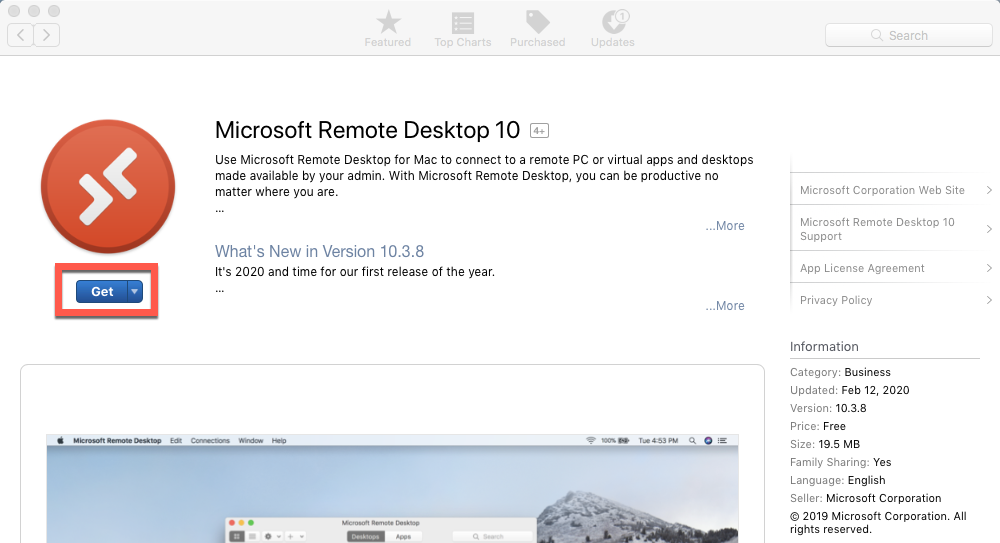
- Click on the App Store icon in your Dock.
- Search for Microsoft Remote Desktop Connection for Mac.
- Click on Get and then click on Install. Follow the on-screen prompts to install the app.
Step 3. On your personal Mac, log in to your work PC
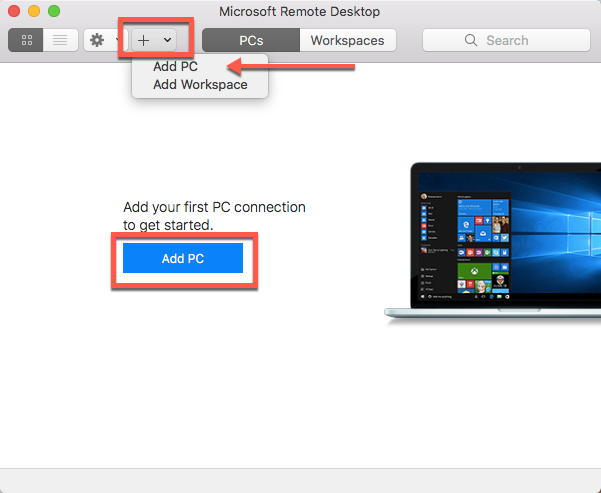
- On your personal Mac, click on the Microsoft Remote Desktop icon in your Dock.

- Click on Add PC. Alternatively, you can instead click on the + icon and select Add PC.
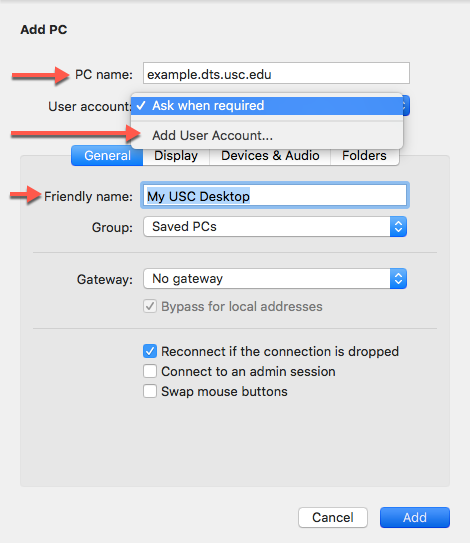
- Update the following fields:
-
Friendly name (optional): Type anything you like, e.g. My USC Desktop
-
PC name: example.dts.usc.edu from Step 1.1 above
-
User account: Click on this field and select Add User Account…
- Type in your Dornsife account credentials and click on Add
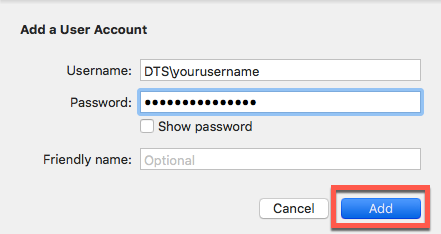
Username: DTS\yourusername
Password: yourpassword
- Click on Add.
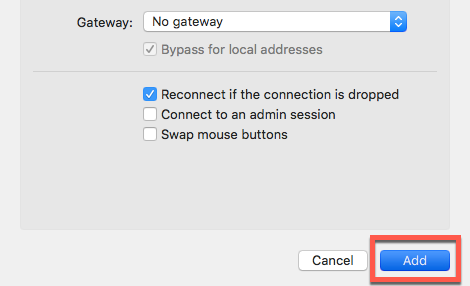
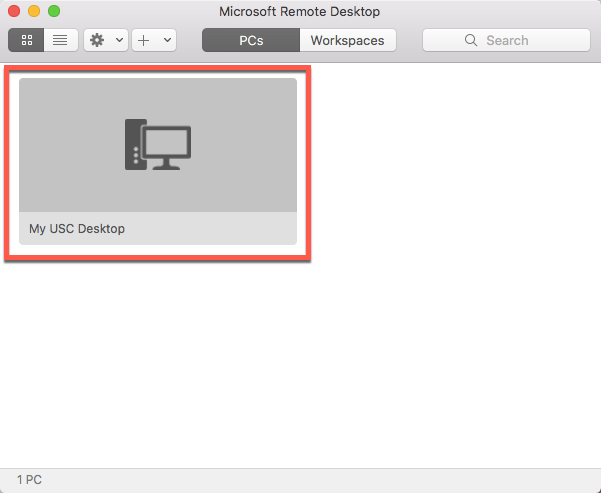
- An icon appears with the name you created. Double click on the icon.
- If a security certificate warning displays, click on Continue.
- You're all set!
Remoting into your work Mac
Remoting into your work Mac from your personal PC
Quick guide
Step 1. Set up your work Mac
- Go to the Apple menu > System Preferences… > Sharing
- On the left side, select the checkbox to turn on Screen Sharing
- Click on Computer Settings…
- Select VNC viewers may control screen with password and create a strong password of your choice.
- Copy down the vnc:// address (vnc://example.address.here).
Step 2. Set up your personal PC
- Connect to the USC network from off-campus via VPN.
- Download and install UltraVNC (scroll down to ultravnc 1240 X64 setup and click on Download).
Step 3. On your personal PC, log in to your work Mac
- On your personal PC, open UltraVNC Viewer.
- In the Computer field, type in your work Mac's address without the vnc:// prefix.
- For example, if your address from Step 1.5 is: vnc://example.address.here
- Here is what you would type: example.address.here
- Click on Connect and type in the password you created on your work Mac in Step 1.4 above.
- You're all set!
Detailed guide (with screenshots)
Step 1. Set up your work Mac
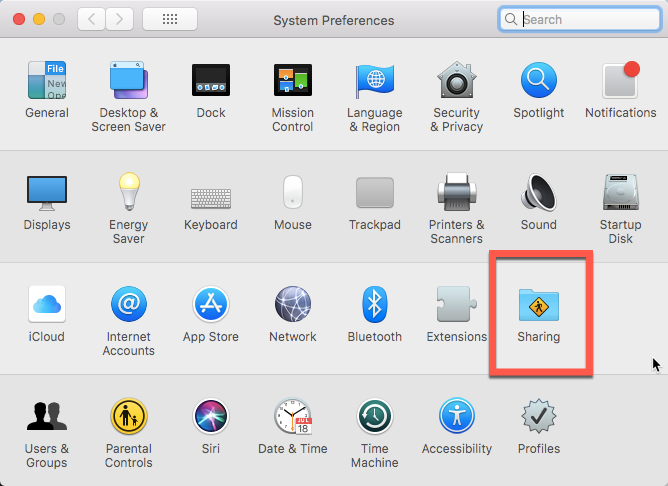
- Go to the Apple menu and click on System Preferences…
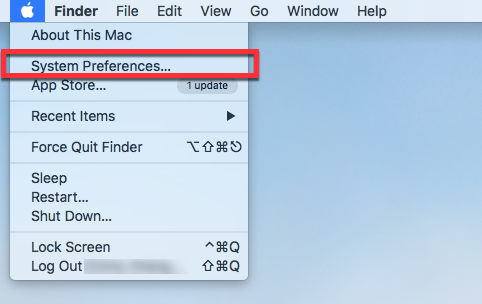
- Click on the Sharing icon.
- Turn on Screen Sharing.
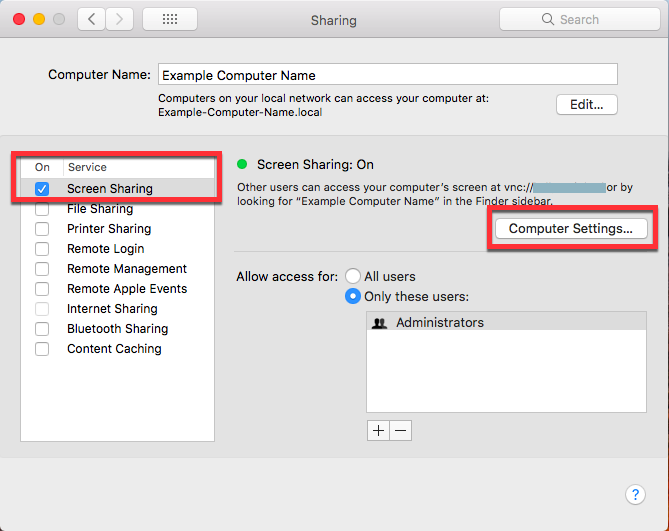
- From the left-hand menu, select the checkbox next to Screen Sharing
- On the right-hand side, click on Computer Settings…
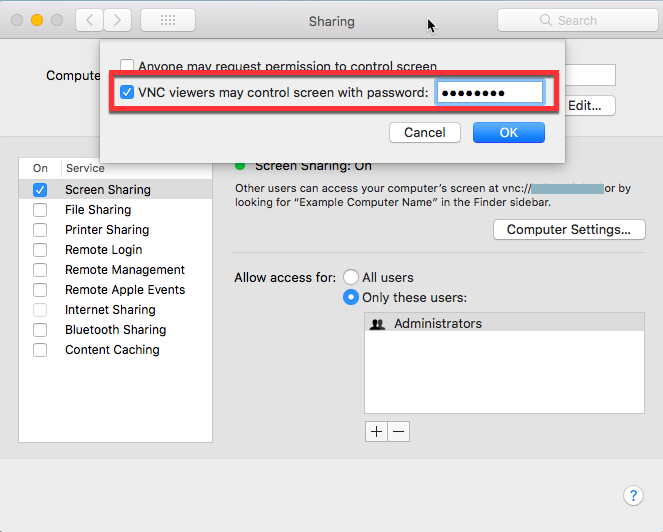
- Select VNC viewers may control screen with password.
Create a strong password of your choice and click on OK.
- Copy down the vnc:// address (vnc://example.address.here).
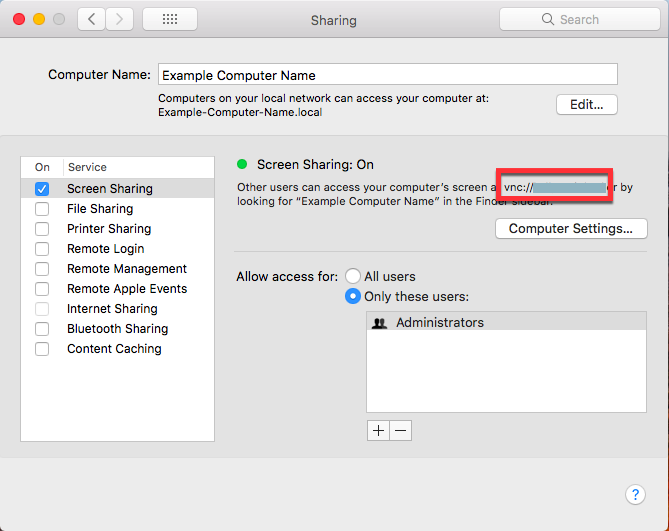
- Close the window to save.
Step 2. Set up your personal PC
- Connect to the USC network from off-campus via VPN.
- Download UltraVNC:
- Install UltraVNC:
- Go to your Downloads folder and double-click on UltraVNC_1_2_40_X64_Setup.exe
- If prompted, enter your admin account credentials for your personal PC.
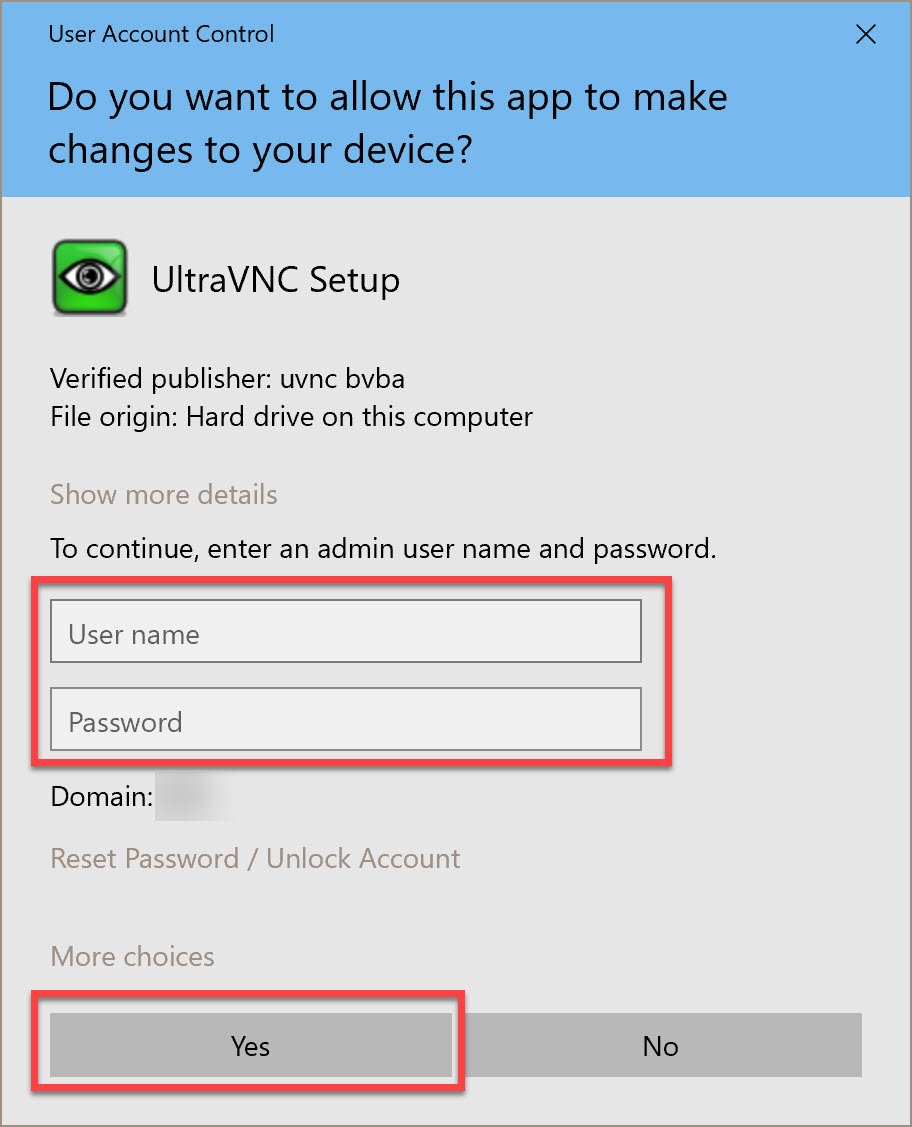
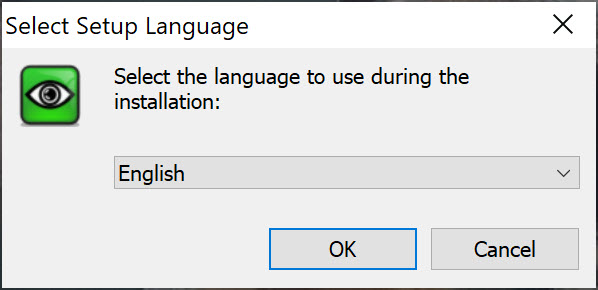
- In the window that opens, follow the on-screen prompts to install UltraVNC.
Step 3. On your personal PC, log in to your work Mac
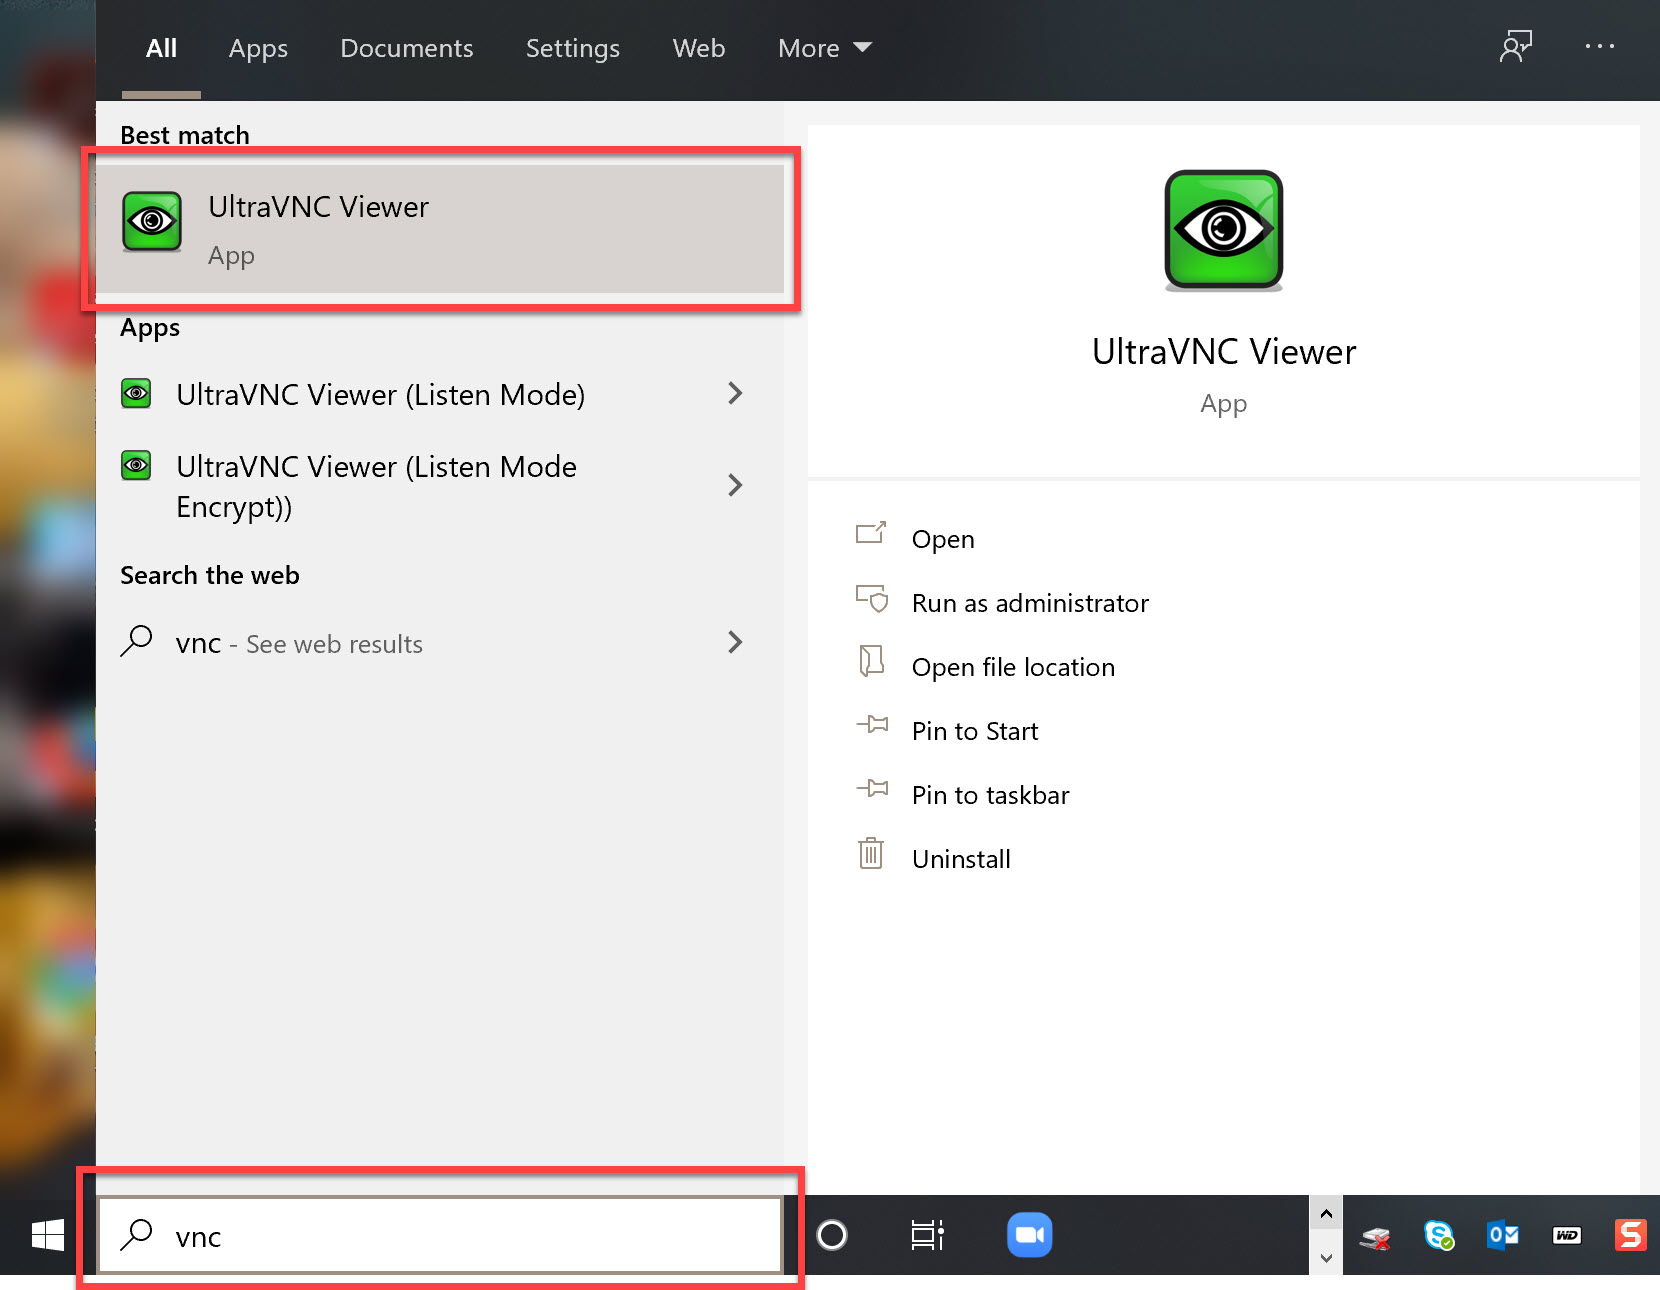
- On your personal PC, type "vnc" into the Start menu search bar. Click on UltraVNC Viewer to open it.
- In the Computer field, type in your work Mac's address without the vnc:// prefix.
- For example, if your address from Step 1.5 is: vnc://example.address.here
- Here is what you would type: example.address.here
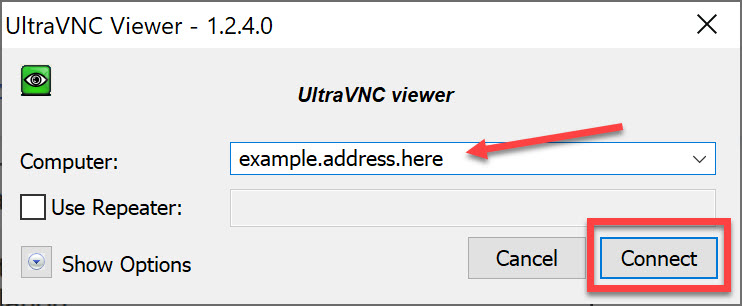
- Click on Connect.
- Type in the password you created on your work Mac in Step 1.4 above.
- You're all set!
Remoting into your work Mac from your personal Mac
Quick guide
Step 1. Set up your work Mac
- Go to the Apple menu > System Preferences… > Sharing
- On the left side, select the checkbox to turn on Screen Sharing
- Click on Computer Settings…
- Select VNC viewers may control screen with password and create a strong password of your choice.
- Copy down the vnc:// address (vnc://example.address.here).
Step 2. Set up your personal Mac
- Connect to the USC network from off-campus via VPN.
Step 3. On your personal Mac, log in to your work Mac
- On your personal Mac, click on the Finder icon in your Dock.
- From the menu at the top of your screen, click on Go > Connect to Server…
- In the Server Address field, type in your work Mac's vnc:// address from Step 1.4 above and click on Connect.
- You're all set!
Detailed guide (with screenshots)
Step 1. Set up your work Mac
- Go to the Apple menu and click on System Preferences…

- Click on the Sharing icon.

- Turn on Screen Sharing.

- From the left-hand menu, select the checkbox next to Screen Sharing
- On the right-hand side, click on Computer Settings…
- Select VNC viewers may control screen with password.
Create a strong password of your choice and click on OK.

- Copy down the vnc:// address (vnc://example.address.here).

- Close the window to save.
Step 2. Set up your personal Mac
- Connect to the USC network from off-campus via VPN.
Step 3. On your personal Mac, log in to your work Mac
- On your personal Mac, click on the Finder icon in your Dock.

- From the menu at the top of your screen, click on Go. Select Connect to Server…
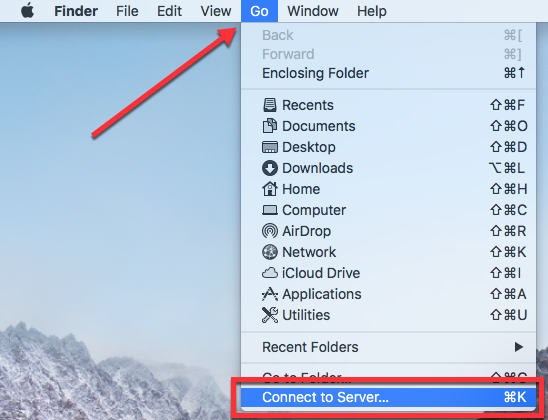
- In the Server Address field, type in your work Mac's vnc:// address from Step 1.4 above and click on Connect.
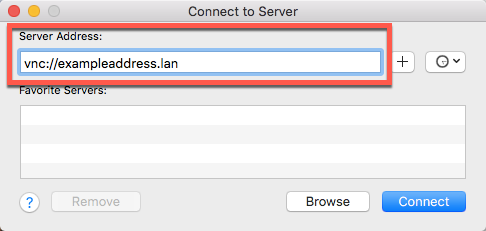
- If prompted, enter your work Mac's user name and password, and click on Sign In.
- You're all set!
Contributor(s): Albert Rodriguez.