Overview
Here we provide some basic instructions for:
- Creating, branding, and sending a Qualtrics survey
- Setting up an event RSVP form in Qualtrics
- Setting up an anonymous feedback survey in Qualtrics
Getting started with Qualtrics
Due to its advanced features, Qualtrics is most effective when used for formal research surveys and questionnaires. It can be used successfully for more informal cases (we provide instructions for event RSVPs and feedback surveys below), but the learning curve is on the steeper side.
If you just want a tool that is above all fast and easy to use, we encourage checking out our instructions for using Google Forms or Microsoft Forms instead.
ITS provides the following cautionary note:
Per USC’s agreement with the software provider, Qualtrics cannot be used to conduct commercial OR government-sponsored research. Additionally, you should not use the Qualtrics survey tool to collect personally identifiable information such as health information, social security numbers, drivers license numbers, or credit card numbers (refer to the Data Classification section of the Information Security policy at policy.usc.edu/info-security). If you have questions regarding these information assurance requirements, please send an email to consult@usc.edu.
(Source: https://itservices.usc.edu/qualtrics/)
Creating a Qualtrics survey
Quick guide
- Log in at https://usc.qualtrics.com.
- Click on Create new project.
- Under "Create your own," click on Survey.
- Click on Get Started.
- Qualtrics creates a new blank form.
- Click on Untitled Project to give the survey a name.
To add a question:
- Click on + Create a New Question to create a new question in the multiple choice format.
- Click on the down-facing arrow to the right of + Create a New Question to create a new question in a different answer format.
To edit a question:
- Click on any question to select it.
- Click on the Click to write the question field and type a question.
- Click on Click to write Choice 1 to type an answer choice. Keep filling in answer choices as needed.
- Use the right-side panel to edit the question settings:
- To change the format, click on Multiple Choice and select another format from the menu.
- To delete or add answer choices, click on - or + under "Choices."
- To allow multiple answer choices, click on Multiple Answer under "Answers."
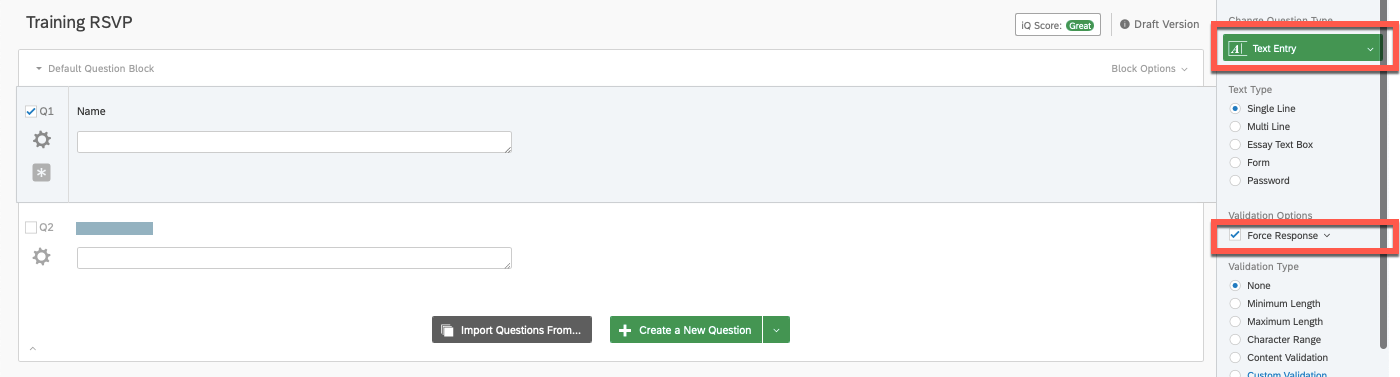
- To make a question required, select the checkbox Force Response under "Validation Options."
To preview the entire survey:
- In the upper right corner of the page, click on Preview.
- The survey preview opens in a new tab and shows both the desktop and mobile view.
Branding a Qualtrics survey
Quick guide
- Log in at https://usc.qualtrics.com.
- Locate and open the survey.
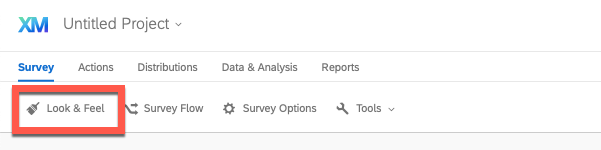
- In the upper left corner of the page, click on Look & Feel.
- The "Look and Feel" window opens.
-
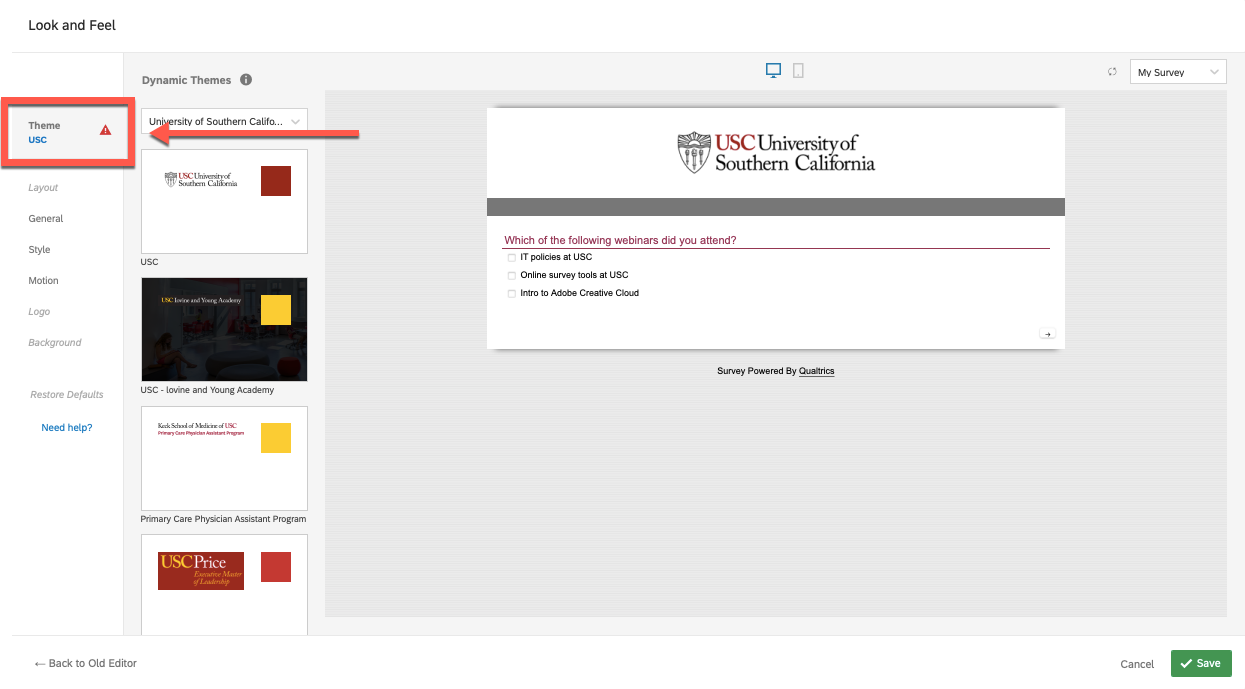
To select a theme:
- In the left-side menu, click on Theme.
- To select an existing theme, click on that theme.
-
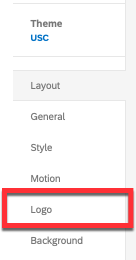
To add a logo or header:
- In the left-side menu, click on Logo.
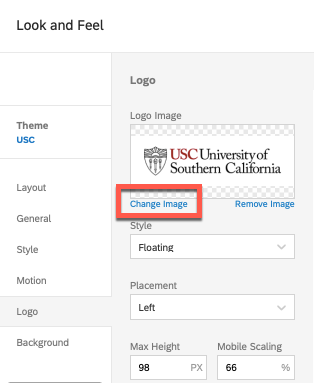
- Click on Change Image.
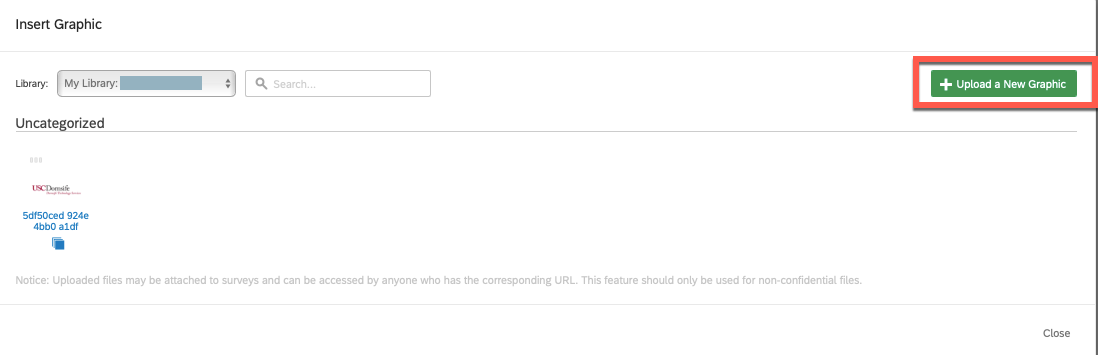
- Select an existing image or, to upload a new image:
- Click on + Upload a New Graphic.
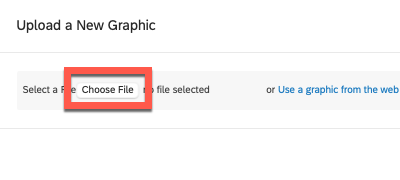
- Click on Choose file and select an image from your computer.
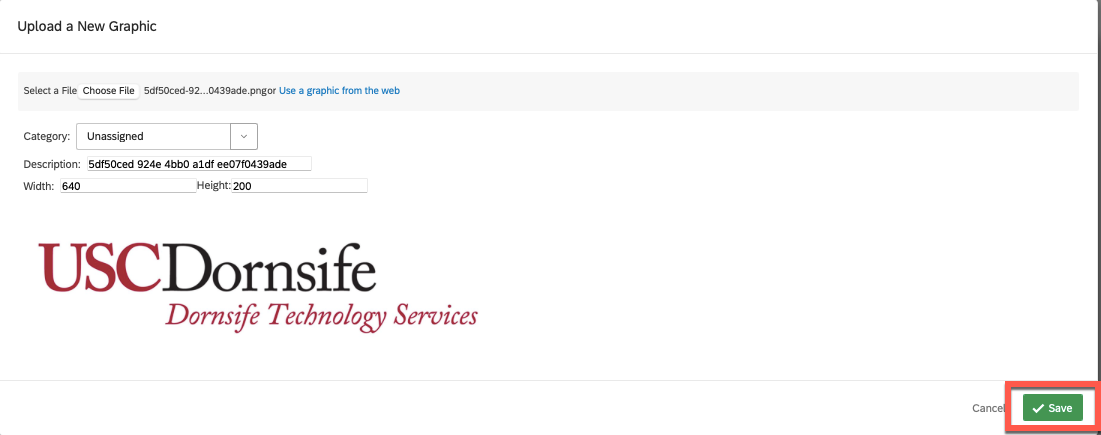
- The image loads. Click on Save.
-
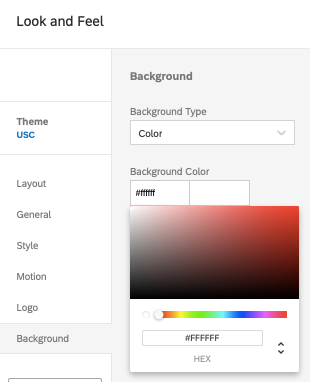
To add a background:
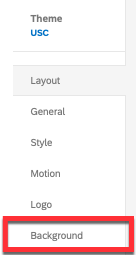
- In the left-side menu, click on Background.
- To use a background image:
- Under "Background Type," select Photo.
- Click on Change Image.
- Click on + Upload a New Graphic.
- Click on Choose file and select an image from your computer.
- The image loads. Click on Save.
- To use a background color instead:
- Under "Background Type," select Color.
- Under "Background Color," click on the second box to open a color picker map. Select a color.
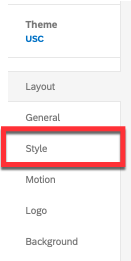
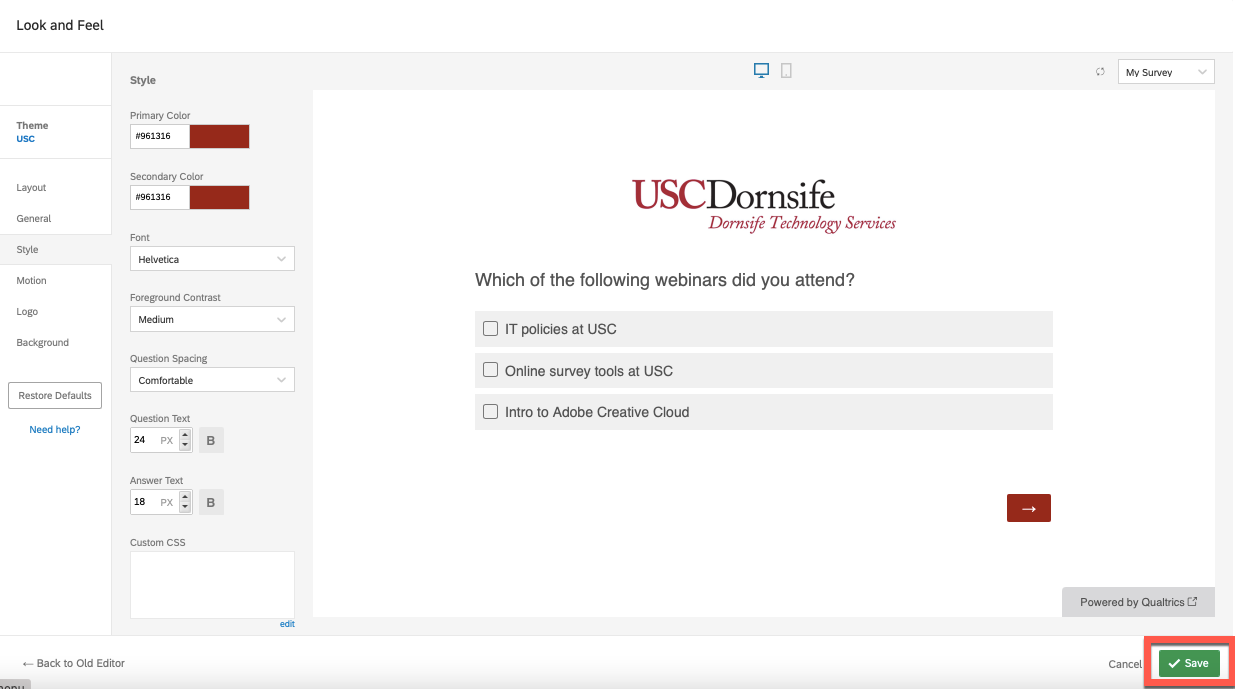
- To make further style changes, click on Style.
- Once you are finished making changes, click on Save to close the "Look and Feel" window.
Detailed guide (with screenshots)
- Log in at https://usc.qualtrics.com.
- Locate and open the survey.
- In the upper left corner of the page, click on Look & Feel.
- The "Look and Feel" window opens.
-
To select a theme:
- In the left-side menu, click on Theme.
- To select an existing theme, click on that theme.
-
To add a logo or header:
- In the left-side menu, click on Logo.
- Click on Change Image.
- Select an existing image or, to upload a new image:
- Click on + Upload a New Graphic.
- Click on Choose file and select an image from your computer.
- The image loads. Click on Save.
-
To add a background:
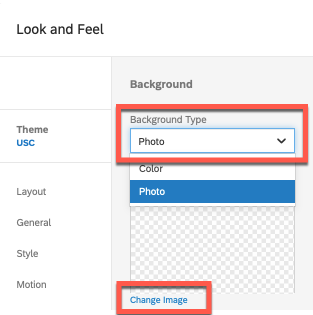
- In the left-side menu, click on Background.
- To use a background image:
- Under "Background Type," select Photo.
- Click on Change Image.
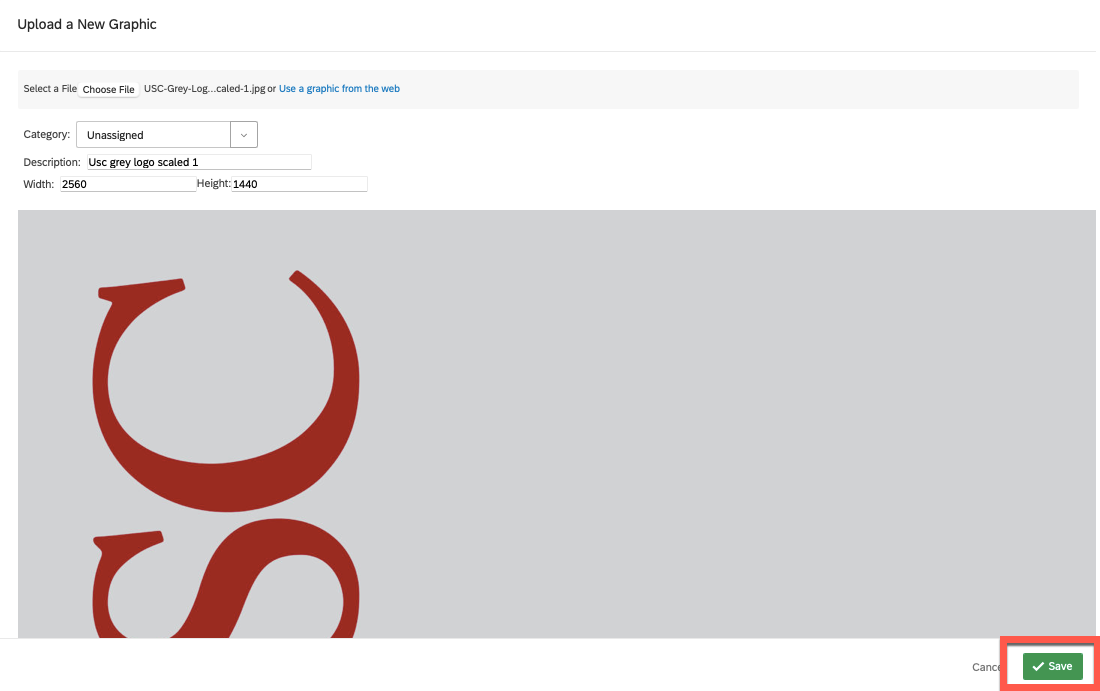
- Click on + Upload a New Graphic.

- Click on Choose file and select an image from your computer.

- The image loads. Click on Save.
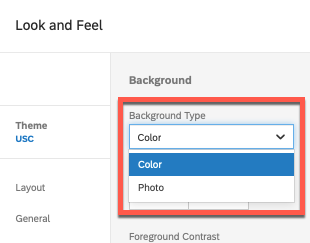
- To use a background color instead:
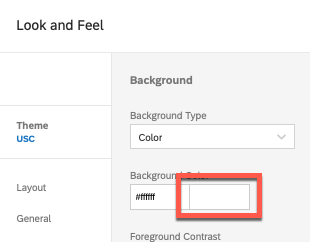
- Under "Background Type," select Color.
- Under "Background Color," click on the second box to open a color picker map. Select a color.
- To make further style changes, click on Style.
- Once you are finished making changes, click on Save to close the "Look and Feel" window.
Sending a Qualtrics survey
Quick guide
- Log in at https://usc.qualtrics.com.
- Locate and open the survey.
- First, confirm the survey response settings:
- In the upper left corner of the page, click on Survey Options.
- The "Survey Options" window opens.
- Under "Survey Protection":
-
Open Access: If you want anyone with the link to be able to take the survey, keep this option selected.
-
By Invitation Only: If you only want people you specify to take the survey, select this option.
-
Prevent Ballot Box Stuffing: If you want to prevent individuals from responding more than once, select this checkbox.
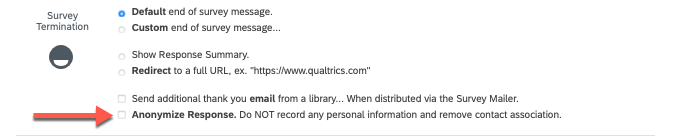
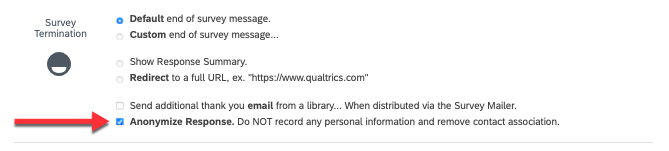
- Under "Survey Termination":
-
Anonymize Response: If you want survey responses to be anonymous, select this checkbox.
- Click on Save.
- Now, publish the survey:
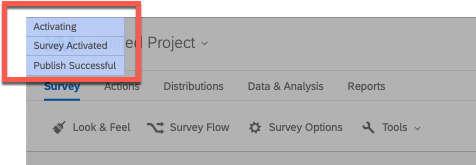
- In the upper right corner of the page, click on Publish.
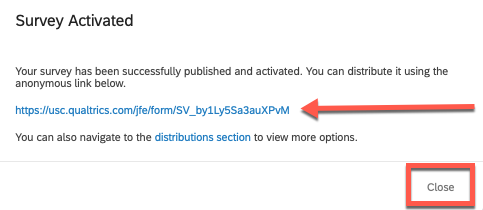
- The "Publish Survey" window opens. Click on Publish.
- Qualtrics activates and publishes the survey, and a confirmation message briefly flashes in the upper left corner of the page. If you had selected "Open Access" earlier, Qualtrics also provides a link to the survey.
- Click on Close.
- Finally, copy and send the survey link (if Qualtrics did not provide it to you in step 4 above):
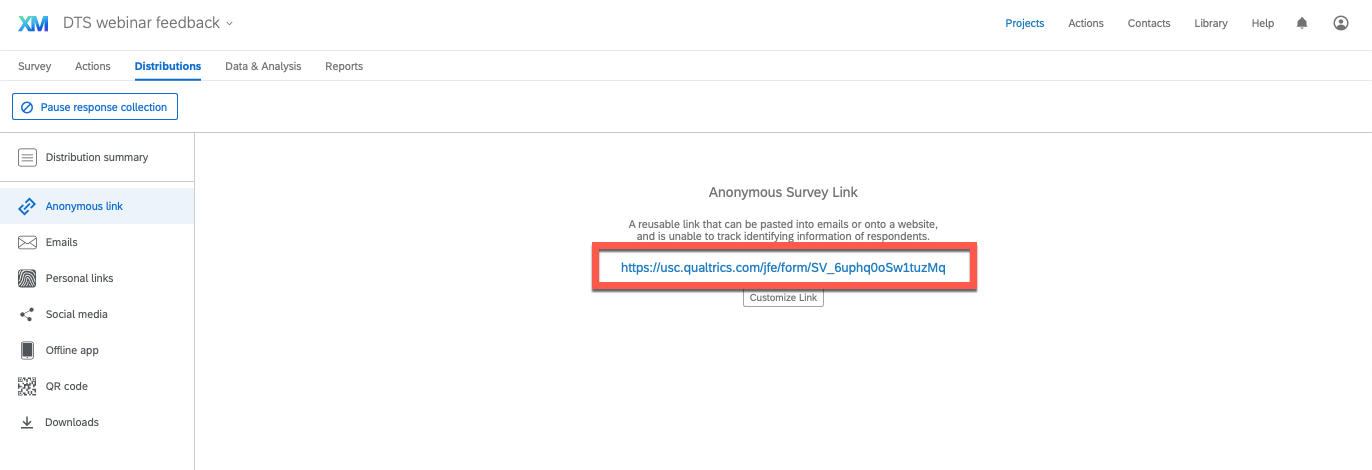
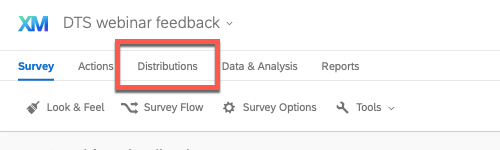
- In the upper left corner of the page, click on Distributions.
- If you set your survey to be "Open Access," copy the anonymous survey link. Send this link by pasting it into an email to your respondents.
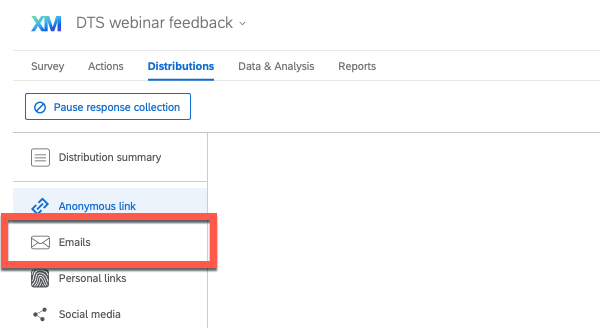
- If you set your survey to be "By Invitation Only":
- In the left-side menu, click on Emails.
- Click on Compose Email.
- The "Compose Email" window opens. Once you complete all the fields, the Send button will no longer be grayed out and you can send the survey.
Detailed guide (with screenshots)
- Log in at https://usc.qualtrics.com.
- Locate and open the survey.
- First, confirm the survey response settings:
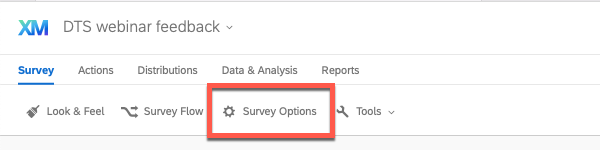
- In the upper left corner of the page, click on Survey Options.

- The "Survey Options" window opens.
- Under "Survey Protection":
-
Open Access: If you want anyone with the link to be able to take the survey, keep this option selected.
-
By Invitation Only: If you only want people you specify to take the survey, select this option.
-
Prevent Ballot Box Stuffing: If you want to prevent individuals from responding more than once, select this checkbox.

- Under "Survey Termination":
-
Anonymize Response: If you want survey responses to be anonymous, select this checkbox.
- Click on Save.

- Now, publish the survey:
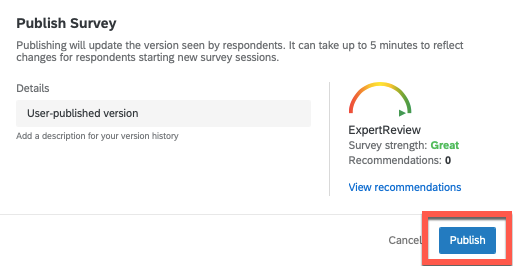
- In the upper right corner of the page, click on Publish.

- The "Publish Survey" window opens. Click on Publish.

- Qualtrics activates and publishes the survey, and a confirmation message briefly flashes in the upper left corner of the page. If you had selected "Open Access" earlier, Qualtrics also provides a link to the survey.
- Click on Close.
- Finally, copy and send the survey link (if Qualtrics did not provide it to you in step 4 above):
- In the upper left corner of the page, click on Distributions.

- If you set your survey to be "Open Access," you can simply copy the anonymous survey link. Send this link by pasting it into an email to your respondents.
- If you set your survey to be "By Invitation Only":
- In the left-side menu, click on Emails.
- Click on Compose Email.
- The "Compose Email" window opens. Once you complete all the fields, the Send button will no longer be grayed out and you can send the survey.
Creating an event RSVP form in Qualtrics
The steps below walk you through setting up an event RSVP form with the following settings:
- Anyone (with or without a USC account) may fill out the survey
- Respondent names and email addresses are collected (i.e. responses are not anonymous)
Quick guide
- Log in at https://usc.qualtrics.com.
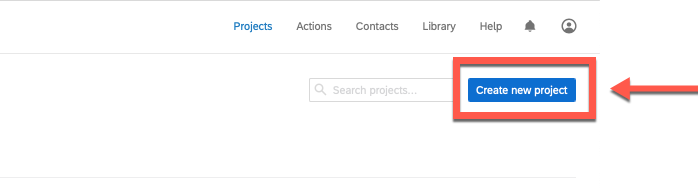
- Click on Create new project.
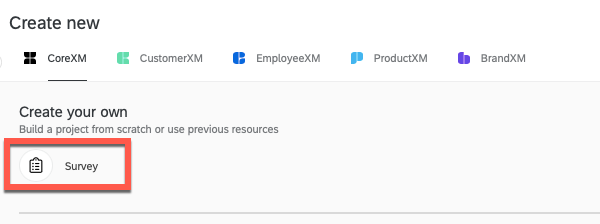
- Under "Create your own," click on Survey.
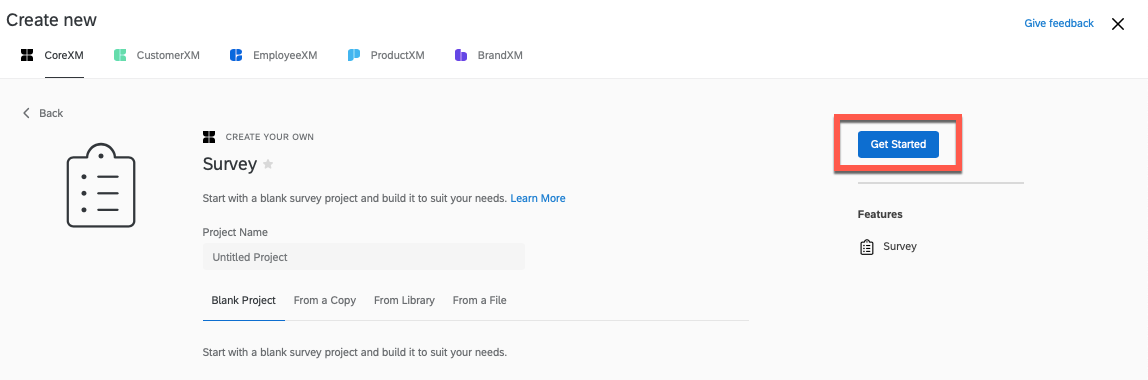
- Click on Get Started.
- Set up the survey (fill out the title, questions, choices, etc).
- For the respondent's name, include a question in Text Entry format. Under "Validation Options," select the checkbox for Force response.
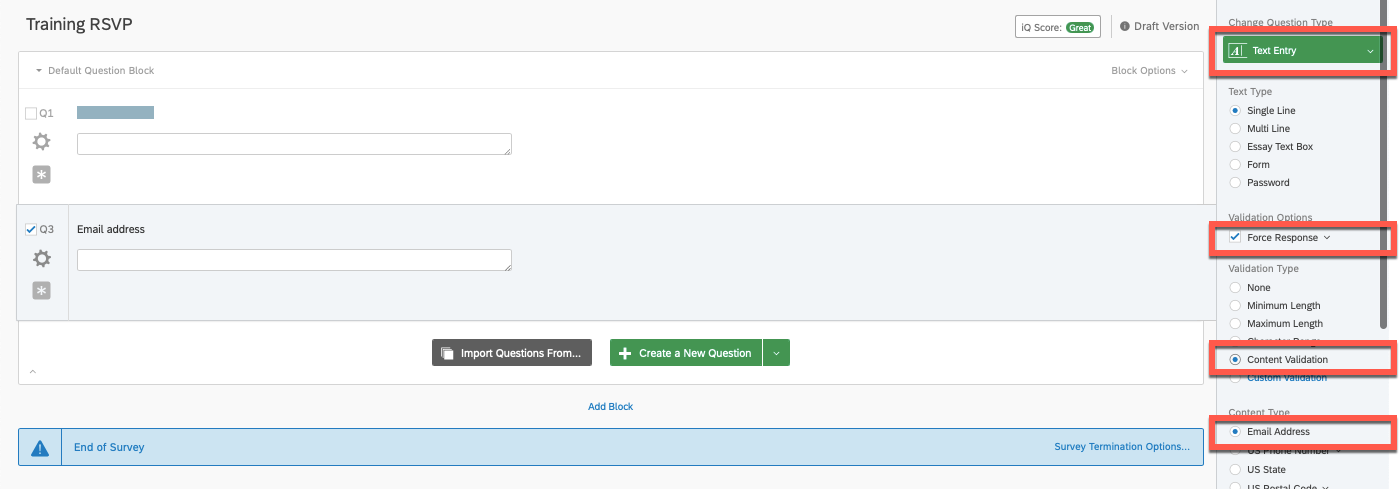
- For the respondent's email address, include a question in Text Entry format. Under "Validation Options," select the checkbox for Force response. Under "Validation Type," select Content Validation. Under "Content Type," select Email Address.
- Copy and send the survey link:
- In the upper right corner of the page, click on Publish.
- The "Publish Survey" window opens. Click on Publish.
- Qualtrics activates the survey and displays an anonymous survey link.
- Send the survey link by pasting it into an email to your respondents. You can also paste the link on a website or in a social media post.
Detailed guide (with screenshots)
- Log in at https://usc.qualtrics.com.
- Click on Create new project.

- Under "Create your own," click on Survey.

- Click on Get Started.

- Set up the survey (fill out the title, questions, choices, etc).
- For the respondent's name, include a question in Text Entry format. Under "Validation Options," select the checkbox for Force response.
- For the respondent's email address, include a question in Text Entry format. Under "Validation Options," select the checkbox for Force response. Under "Validation Type," select Content Validation. Under "Content Type," select Email Address.
- Copy and send the survey link:
- In the upper right corner of the page, click on Publish.

- The "Publish Survey" window opens. Click on Publish.
- Qualtrics activates the survey and displays an anonymous survey link.

- Send the survey link by pasting it into an email to your respondents. You can also paste the link on a website or in a social media post.
Creating an anonymous feedback survey in Qualtrics
The steps below walk you through setting up an anonymous survey for feedback or voting with the following settings:
- Respondents must log into their USC account in order to access the survey
- Each USC account may only fill out and submit the survey once
- Account information is not recorded, so responses are anonymous
Quick guide
Step 1: Set up the survey
- Log in at https://usc.qualtrics.com.
- Click on Create new project.
- Under "Create your own," click on Survey.
- Click on Get Started.
- Set up the survey (fill out the title, questions, choices, etc). Make sure you do not ask for any identifying information from the respondent, such as name or contact information.
- In the upper left corner of the page, click on Survey Options.
- The "Survey Options" window opens.
- Under "Survey Protection," select By Invitation Only and Prevent Ballot Box Stuffing.
- Under "Survey Termination," select Anonymize Response.
- Click on Save.
- In the upper right corner of the page, click on Publish.
- The "Publish Survey" window opens. Click on Publish.
- Click on Close.
Step 2: Use the built-in email feature in Qualtrics to send the survey
- Decide how you will input respondents' email addresses:
-
Option 1: Manually type respondents' email addresses directly in Qualtrics:
- In the upper left corner of the page, click on Distributions.
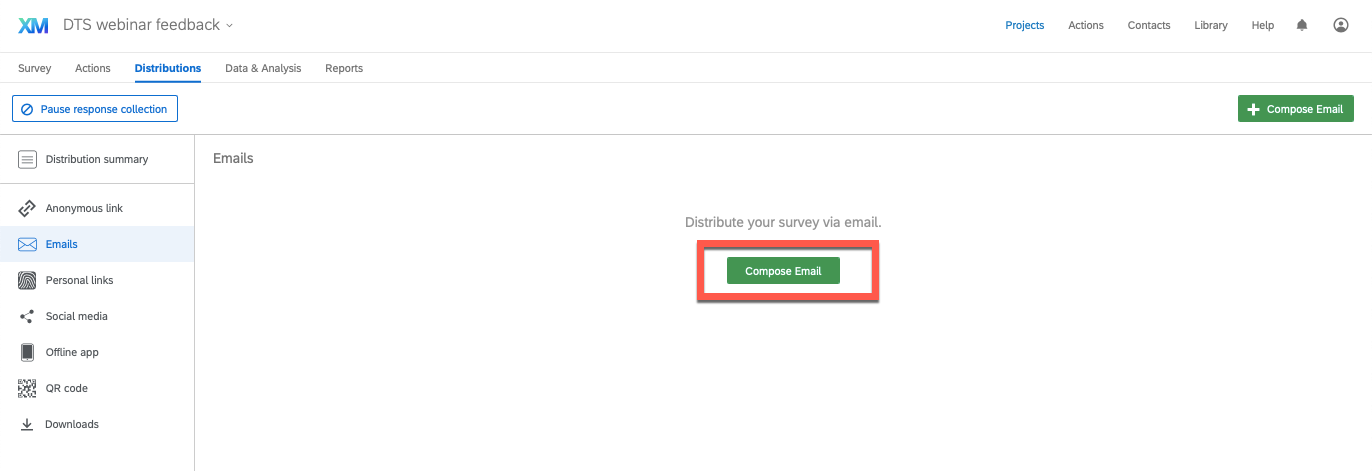
- Click on Emails.
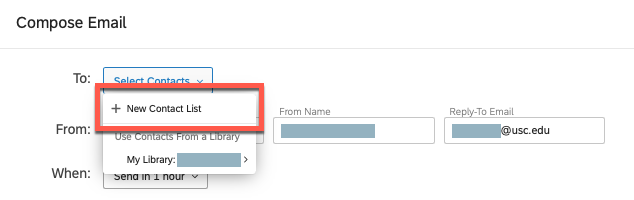
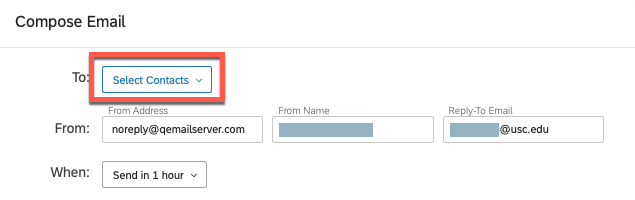
- Click on Compose Email.
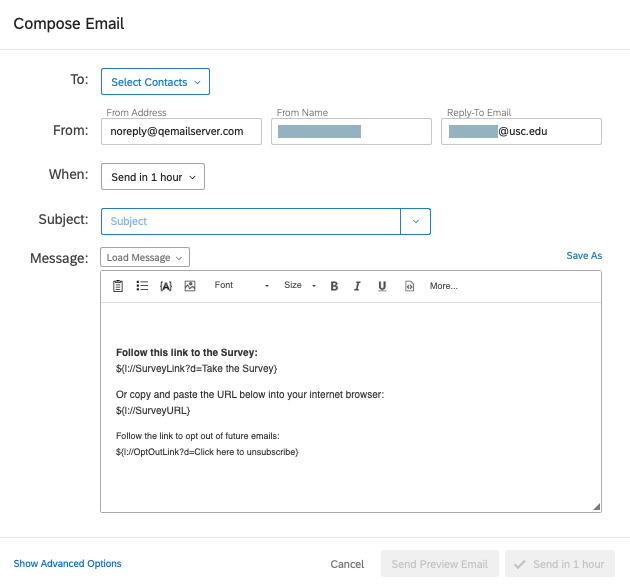
- Click on Select Contacts.
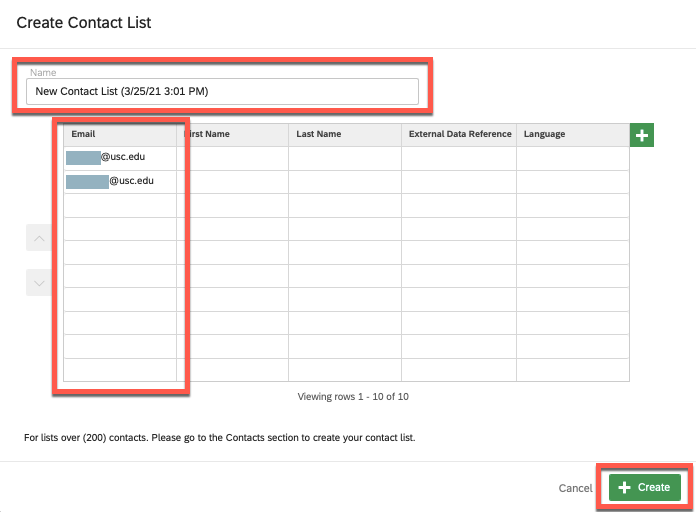
- Click on + New Contact List.
- Type in your respondents' email addresses one by one (the other columns are optional).
- Click on + Create.
-
Option 2: Upload an existing spreadsheet of your respondents' email addresses:
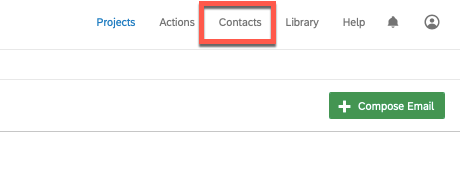
- In the upper right corner of the page, click on Contacts.
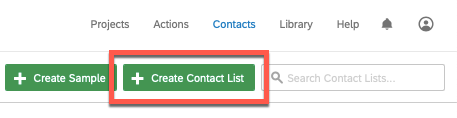
- Click on + Create New Contact List.
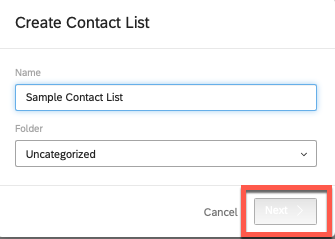
- The "Create Contact List" window opens. Fill out the Name and select a Folder, and click on Next.
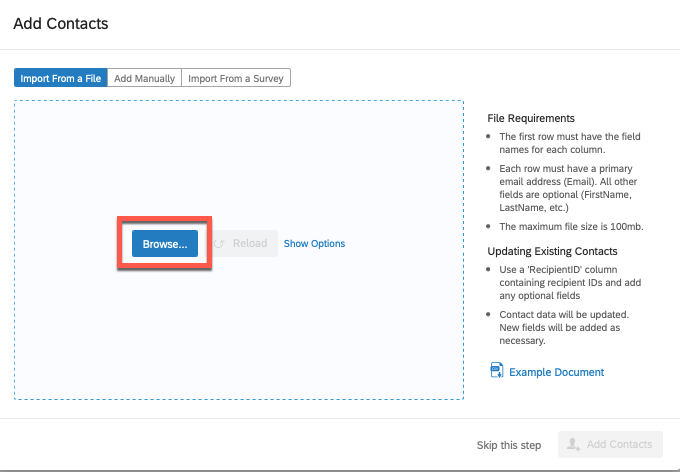
- Click on Browse… and select a .csv file from your computer.
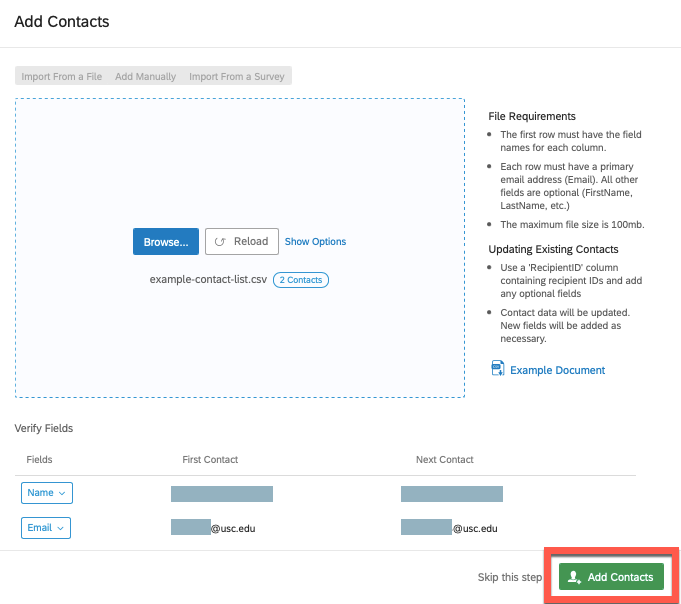
- The file loads. Click on Add Contacts.
- Qualtrics begins importing the file (takes a few minutes). Once complete, the list displays on the page.
- In the upper right corner of the page, click on Projects.
- Locate and open the survey.
- In the upper left corner of the page, click on Distributions.
- Click on Emails.
- Click on Compose Email.
- Click on Select Contacts.
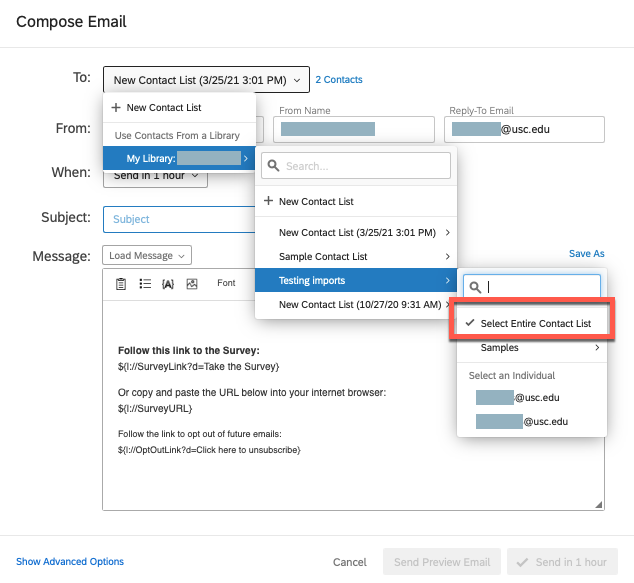
- Under "Use Contacts From a Library," click on My Library.
- Select the list you uploaded, and click on Select Entire Contact List.
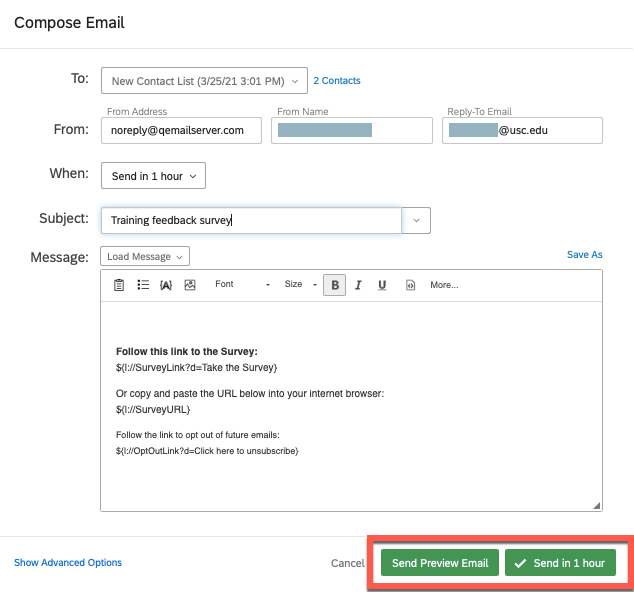
- Edit further details as needed (scheduled time, subject, message).
- Click on Send. Qualtrics sends the survey via email to your respondents.
Detailed guide (with screenshots)
Step 1: Set up the survey
- Log in at https://usc.qualtrics.com.
- Click on Create new project.
- Under "Create your own," click on Survey.
- Click on Get Started.
- Set up the survey (fill out the title, questions, choices, etc). Make sure you do not ask for any identifying information from the respondent, such as name or contact information.
- In the upper left corner of the page, click on Survey Options.
- The "Survey Options" window opens.
- Under "Survey Protection," select By Invitation Only and Prevent Ballot Box Stuffing.

- Under "Survey Termination," select Anonymize Response.
- Click on Save.

- In the upper right corner of the page, click on Publish.
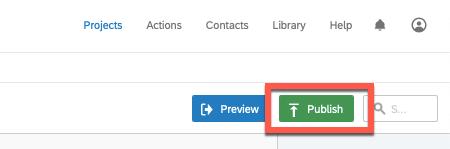
- The "Publish Survey" window opens. Click on Publish.

- Click on Close.
Step 2: Use the built-in email feature in Qualtrics to send the survey
- Decide how you will input respondents' email addresses:
-
Option 1: Manually type respondents' email addresses directly in Qualtrics:
- In the upper left corner of the page, click on Distributions.
- Click on Emails.

- Click on Compose Email.

- Click on Select Contacts.

- Click on + New Contact List.
- Type a Name for your contact list, and type in your respondents' email addresses one by one (the other columns are optional).
- Click on + Create.
-
Option 2: Upload an existing spreadsheet of your respondents' email addresses:
- In the upper right corner of the page, click on Contacts.
- Click on + Create New Contact List.
- The "Create Contact List" window opens. Fill out the Name and select a Folder, and click on Next.
- Click on Browse… and select a .csv file from your computer.
- The file loads. Click on Add Contacts.
- Qualtrics begins importing the file (takes a few minutes). Once complete, the list displays on the page.
- In the upper right corner of the page, click on Projects.

- Locate and open the survey.
- In the upper left corner of the page, click on Distributions.

- Click on Emails.

- Click on Compose Email.

- Click on Select Contacts.
- Under "Use Contacts From a Library," click on My Library.
- Select the list you uploaded, and click on Select Entire Contact List.
- Edit further details as needed (scheduled time, subject, message).
- Click on Send. Qualtrics sends the survey via email to your respondents.
Additional resources