Overview
As of 2023, DTS recommends using PaperCut instead to install Dornsife printers. You can follow this guide:
PaperCut is effective for printing from Dornsife-managed computers as well as personal, non-USC computers.
You can print from your computer to your group/department's designated on-campus wireless printers—more commonly known as Dornsife network printers. Simply follow the steps below for adding (installing) a printer to your computer.
Before you begin, make sure that…
- The printer you want to use is on and is not displaying an error message
- Your computer is connected to the Internet using either USC Secure Wireless or Ethernet (not USC Guest Wireless)
- Your account has permission to use the printer
Adding a Dornsife network printer to your Windows PC
Add a printer to your Dornsife-managed Windows PC
Quick guide
If you are using a Dornsife-managed Windows PC on campus, when you try to print you should automatically be able to select any network printers for which you were granted access. If the network printer(s) don't appear for you, however, you can add them manually:
- Make sure you're connected to the USC network via either Ethernet or USC Secure Wireless. (Do not use USC Guest Wireless.)
- In the Windows Start menu search bar, type printer
- Click Printers & scanners.
- Click Add a printer or scanner. Allow about 5 seconds for the list to load.
- Click on the network printer to select it. Then, click Add device.
- Not seeing your specific printer listed? Follow these steps:
- Scroll to the bottom of the printer list and click Search Universal Print for printers.
- Type in part of the printer name or leave the search bar blank, and click Search.
- Click on a printer to select it, and then click Add device. (If you still do not see your specific printer, please contact us at ts@dornsife.usc.edu and a technician can help troubleshoot the printer.)
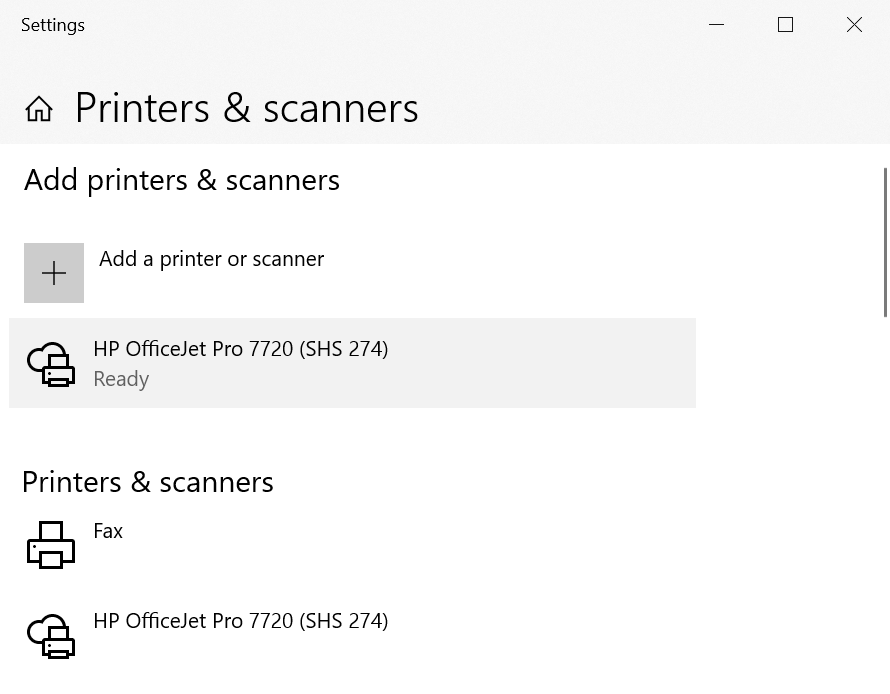
- Once "Ready" appears underneath the printer name, you're all set! The next time that you try to print from Microsoft Word or any other program, this printer will appear as an option.
Detailed guide (with screenshots)
If you are using a Dornsife-managed Windows PC on campus, when you try to print you should automatically be able to select any network printers for which you were granted access. If the network printer(s) don't appear for you, however, you can add them manually:
- Make sure you're connected to the USC network via either Ethernet or USC Secure Wireless. (Do not use USC Guest Wireless.)
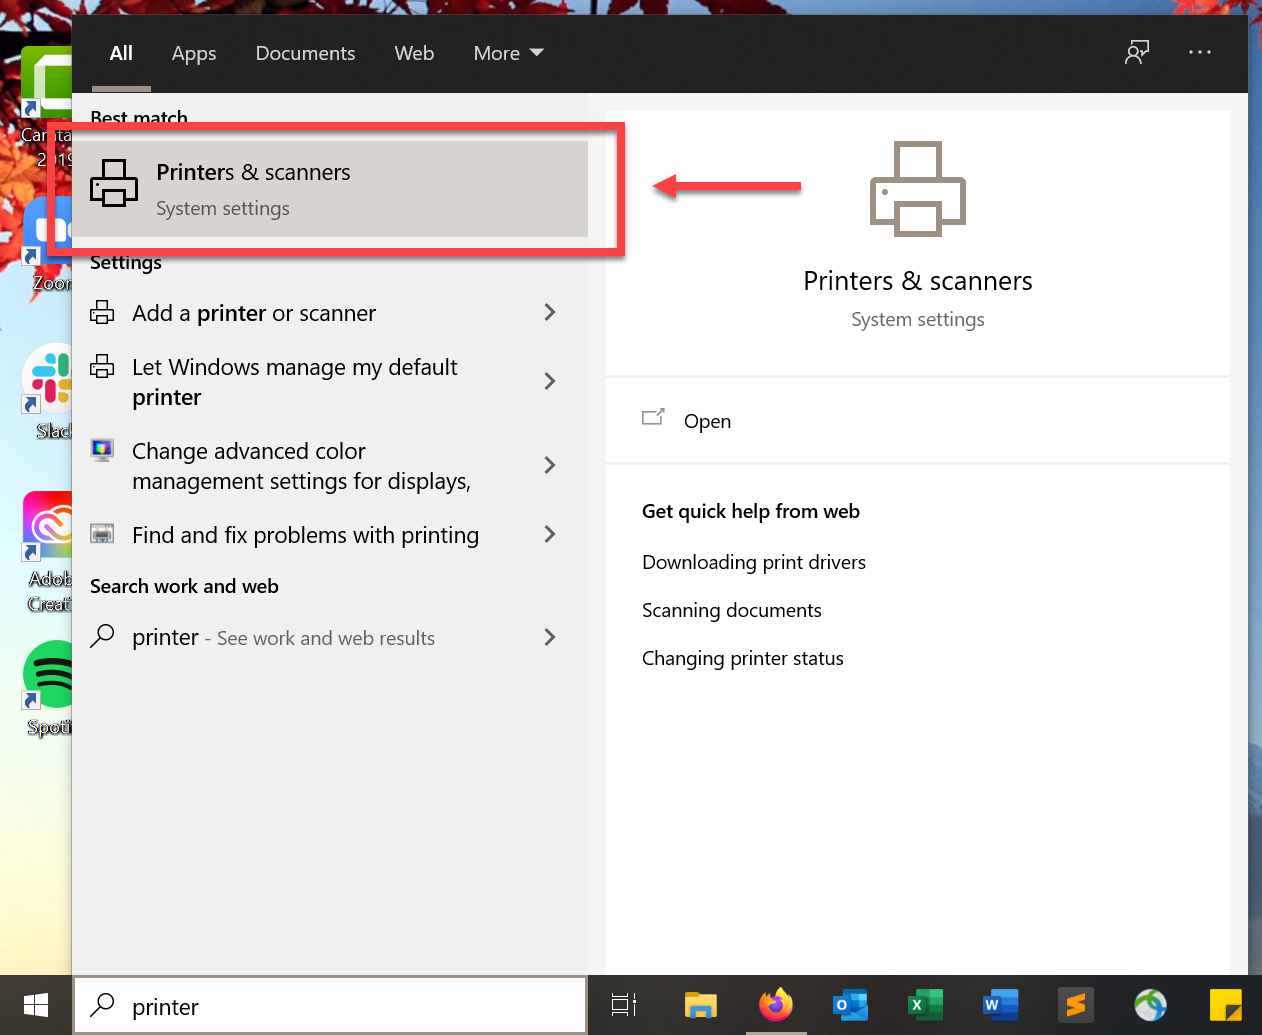
- In the Windows Start menu search bar, type printer

- Click Printers & scanners.
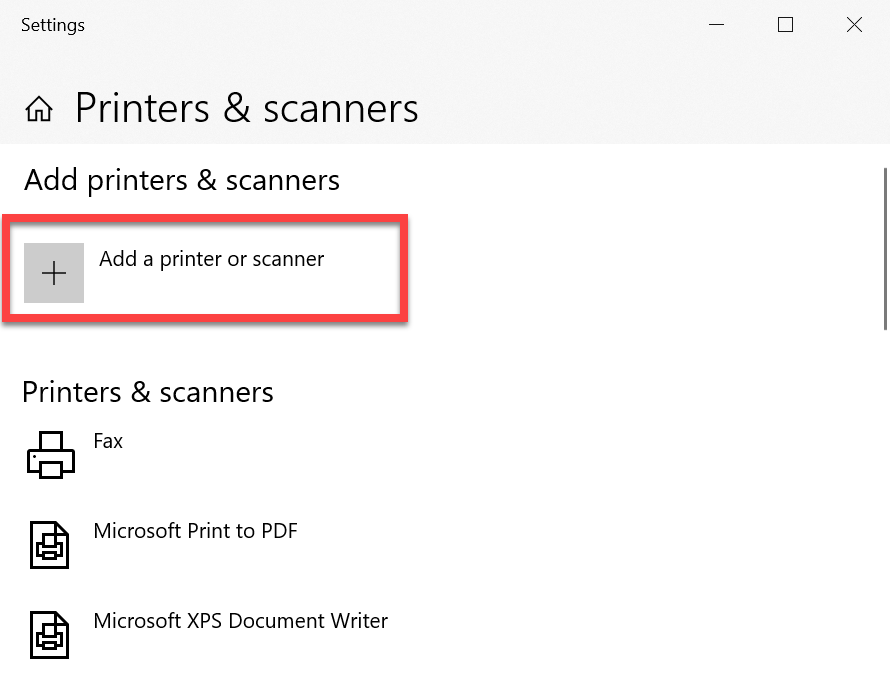
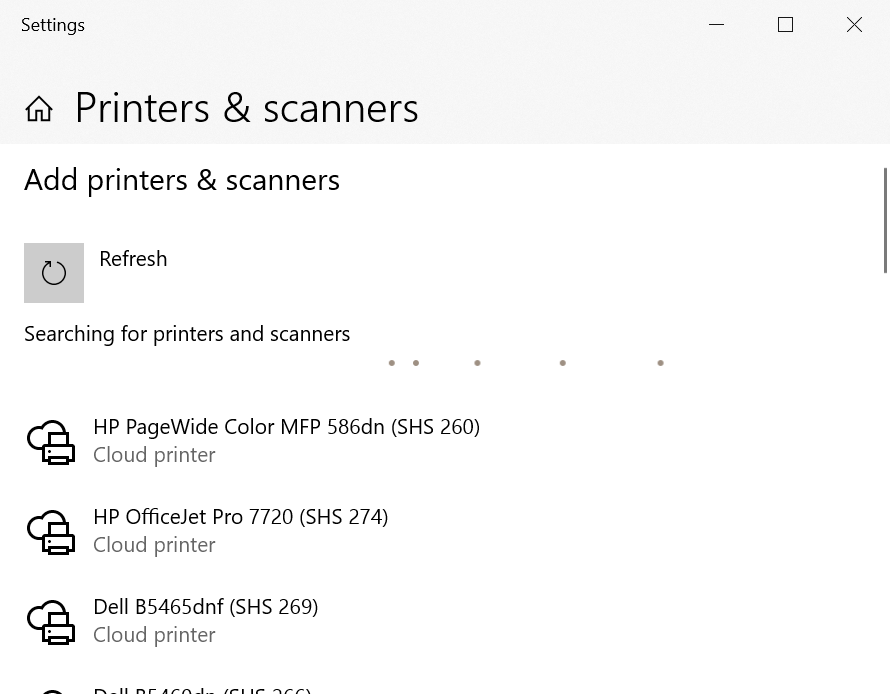
- Click Add a printer or scanner. Allow about 5 seconds for the list to load.
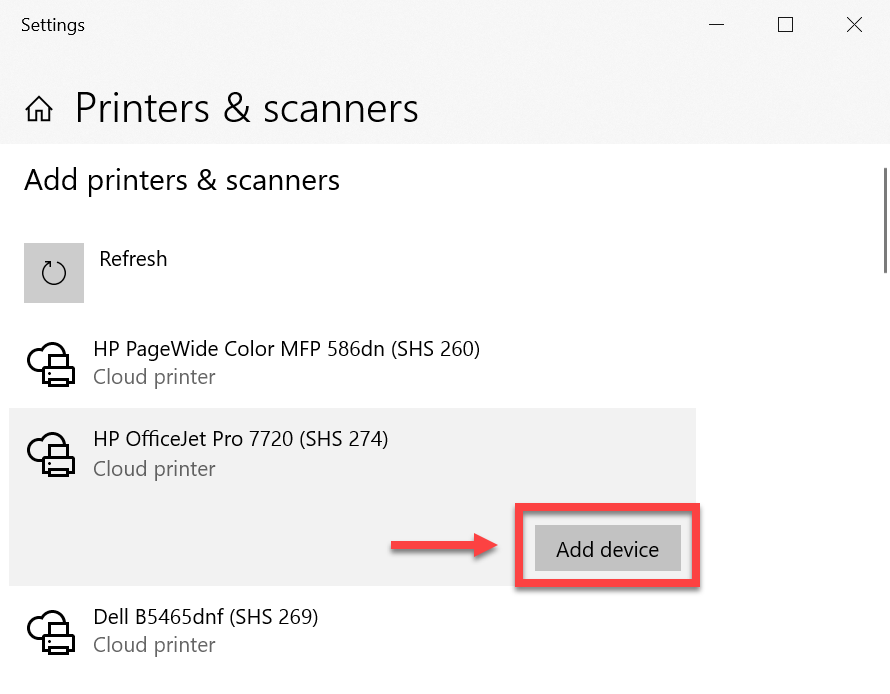
- Click on the network printer to select it. Then, click Add device.
- Not seeing your specific printer listed? Follow these steps:
- Scroll to the bottom of the printer list and click Search Universal Print for printers.
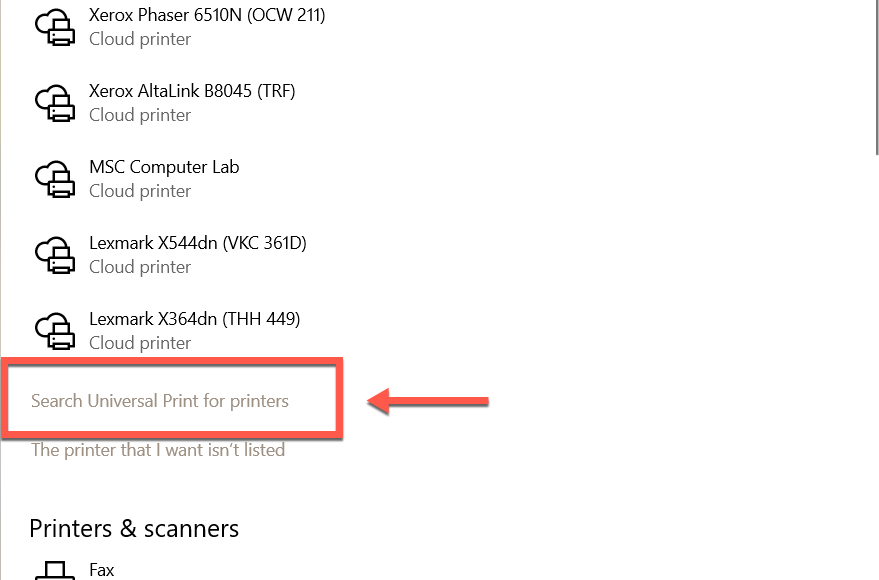
- Type in part of the printer name or leave the search bar blank, and click Search.
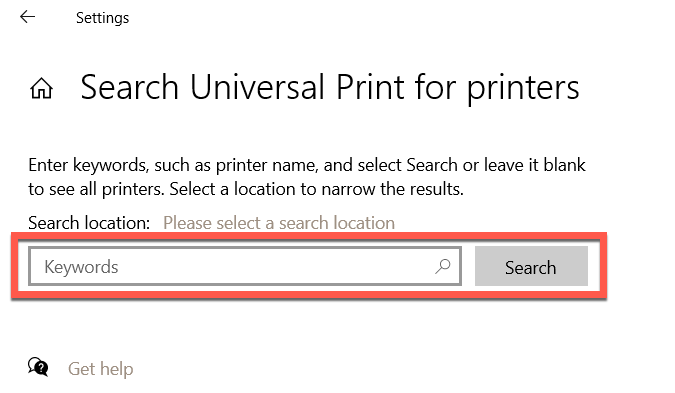
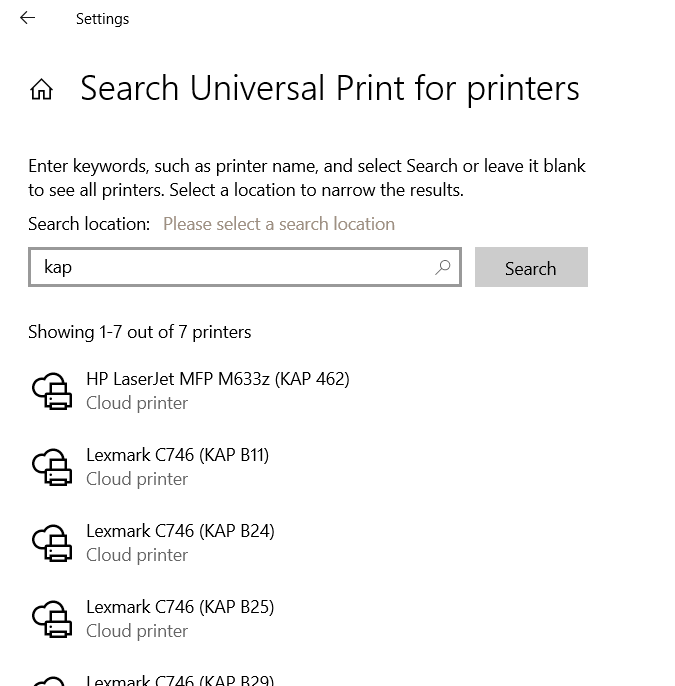
- Click on a printer to select it, and then click Add device. (If you still do not see your specific printer, please contact us at ts@dornsife.usc.edu and a technician can help troubleshoot the printer.)
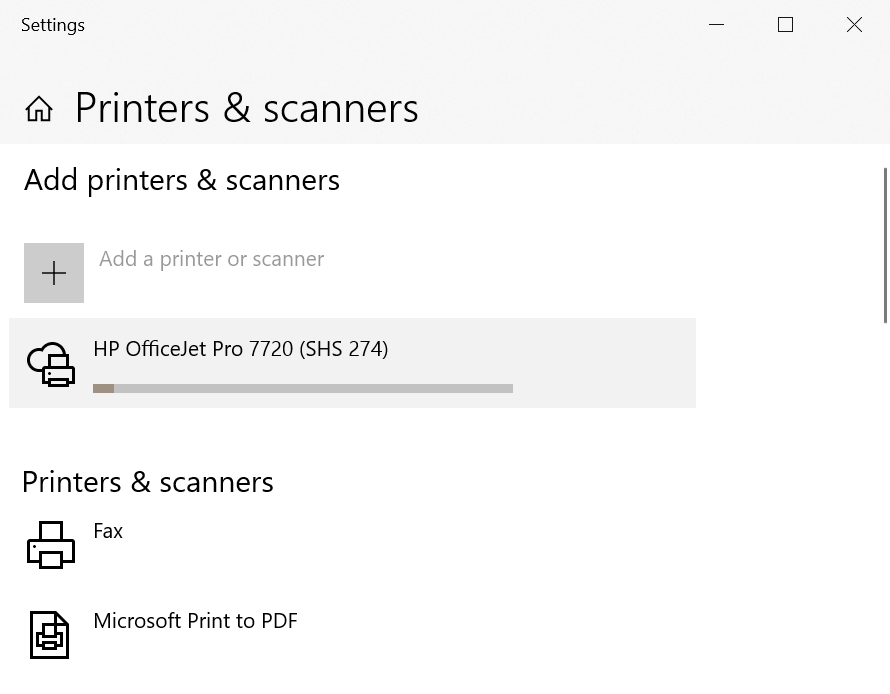
- Once "Ready" appears underneath the printer name, you're all set! The next time that you try to print from Microsoft Word or any other program, this printer will appear as an option.
Add a printer to your personal Windows PC
Quick guide
- Make sure you're connected to the USC network via either Ethernet or USC Secure Wireless. (Do not use USC Guest Wireless.)
- In the Windows Start menu search bar, type printer
- Click Printers & scanners.
- Click Add a printer or scanner.
- Scroll down and click The printer that I want isn't listed.
- If prompted, input the login information for your personal computer. Click Yes.
- Click on Select a shared printer by name. Then, click Browse…
- Click on the address bar at the top and type \\dtsprint.dts.usc.edu
- Press Enter on your keyboard.
- When prompted, type in your credentials as follows and click OK:
- Username: dts\yourUSCNetID (e.g. if your email address is ttrojan@usc,edu, type dts\ttrojan)
- Password: Your USC NetID passphrase
- If you select the checkbox Remember my credentials, you won't have to input your credentials after this first time.
- The full list of Dornsife network printers loads. Click on your network printer to select it. Then, click Select.
- Click Next.
- Allow about 5–10 seconds for the printer to be added. Click Next.
- Click Print a test page or Finish. You're all set!
Detailed guide (with screenshots)
- Make sure you're connected to the USC network via either Ethernet or USC Secure Wireless. (Do not use USC Guest Wireless.)
- In the Windows Start menu search bar, type printer

- Click Printers & scanners.
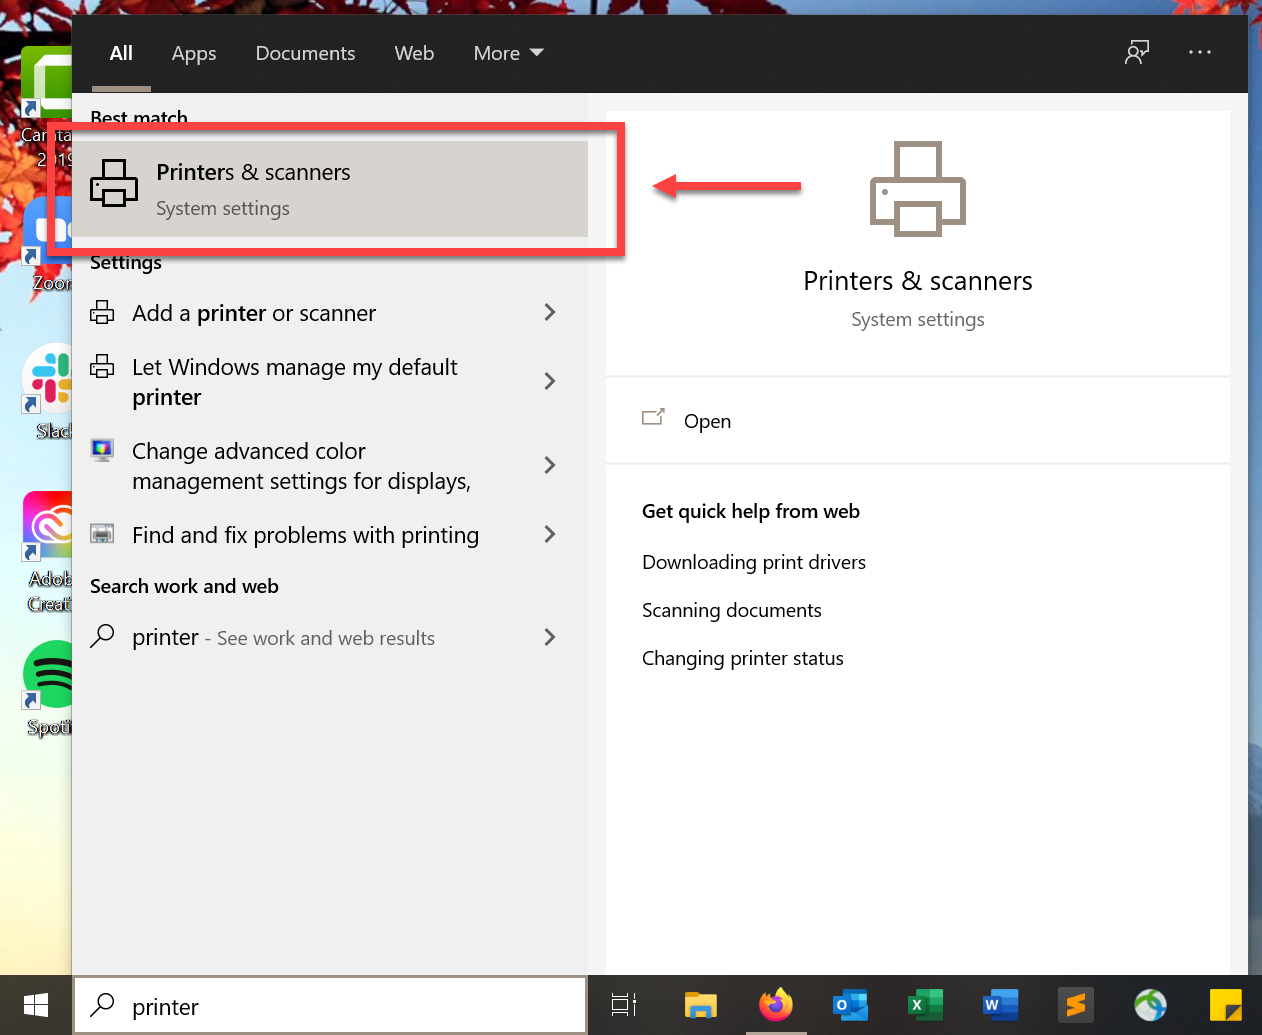
- Click Add a printer or scanner.
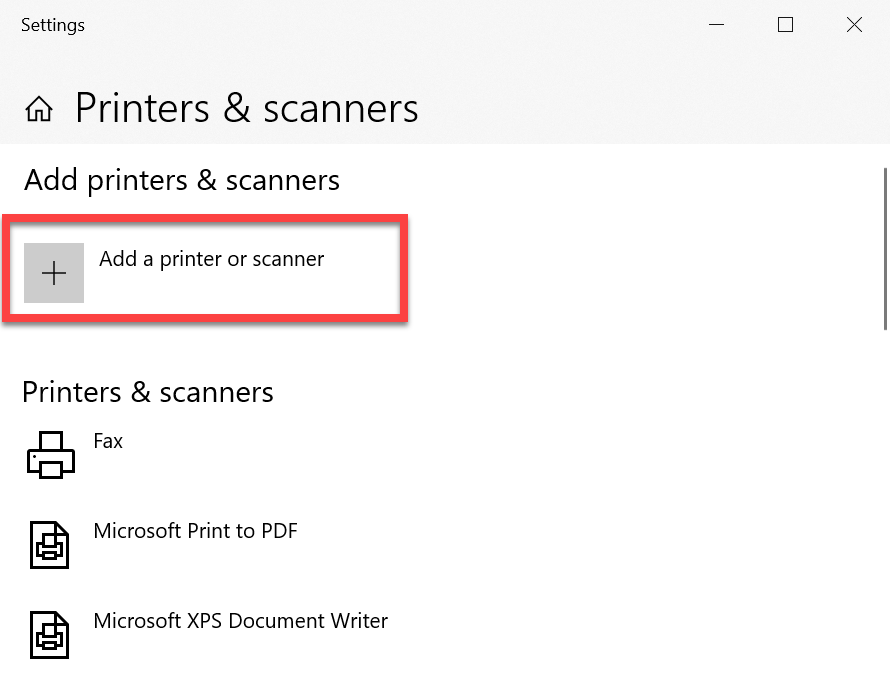
- Scroll down and click The printer that I want isn't listed.
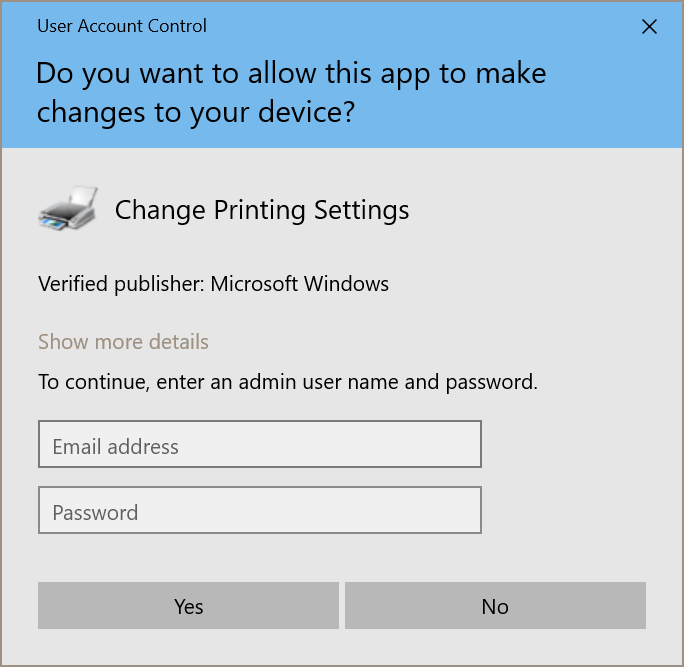
- If prompted, input the login information for your personal computer. Click Yes.
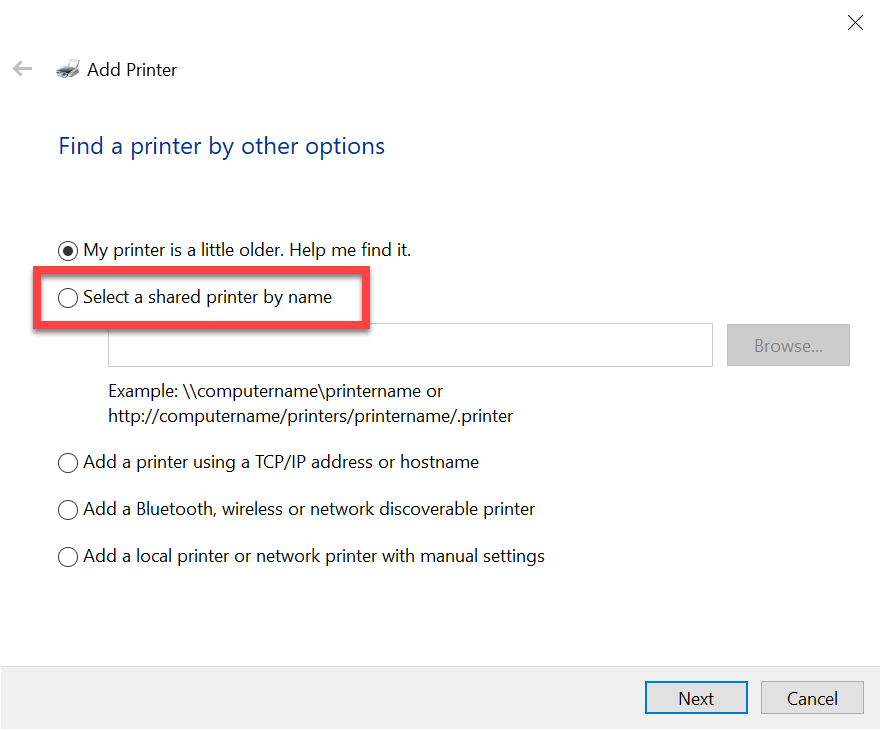
- Click Select a shared printer by name. Then, click Browse…
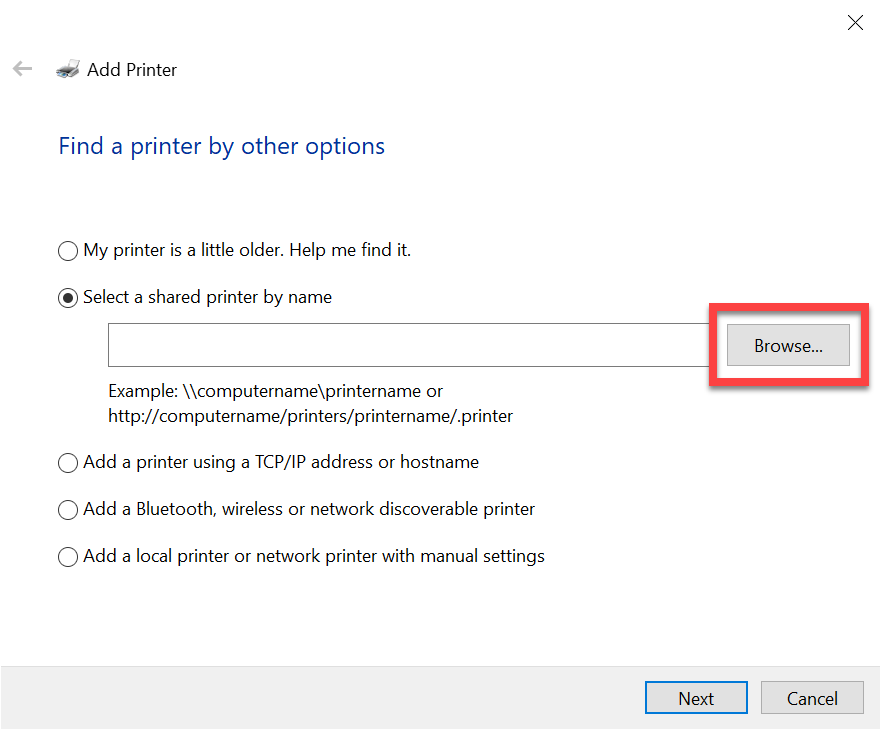
- Click on the address bar at the top and type \\dtsprint.dts.usc.edu
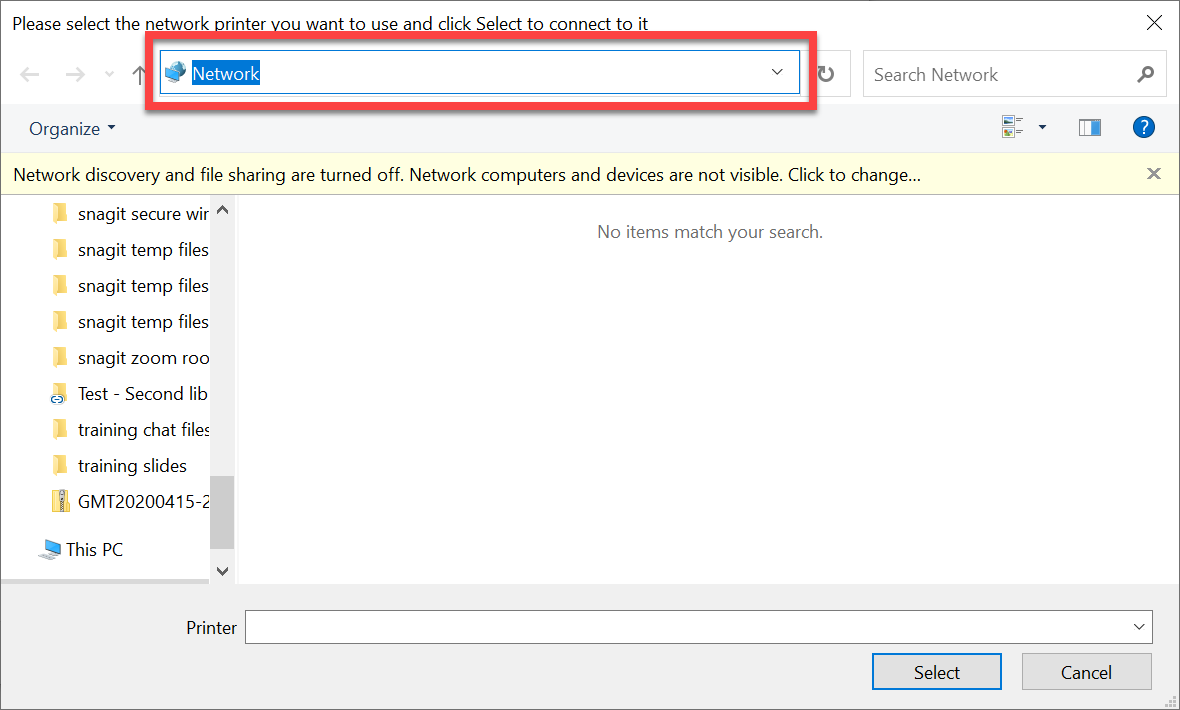
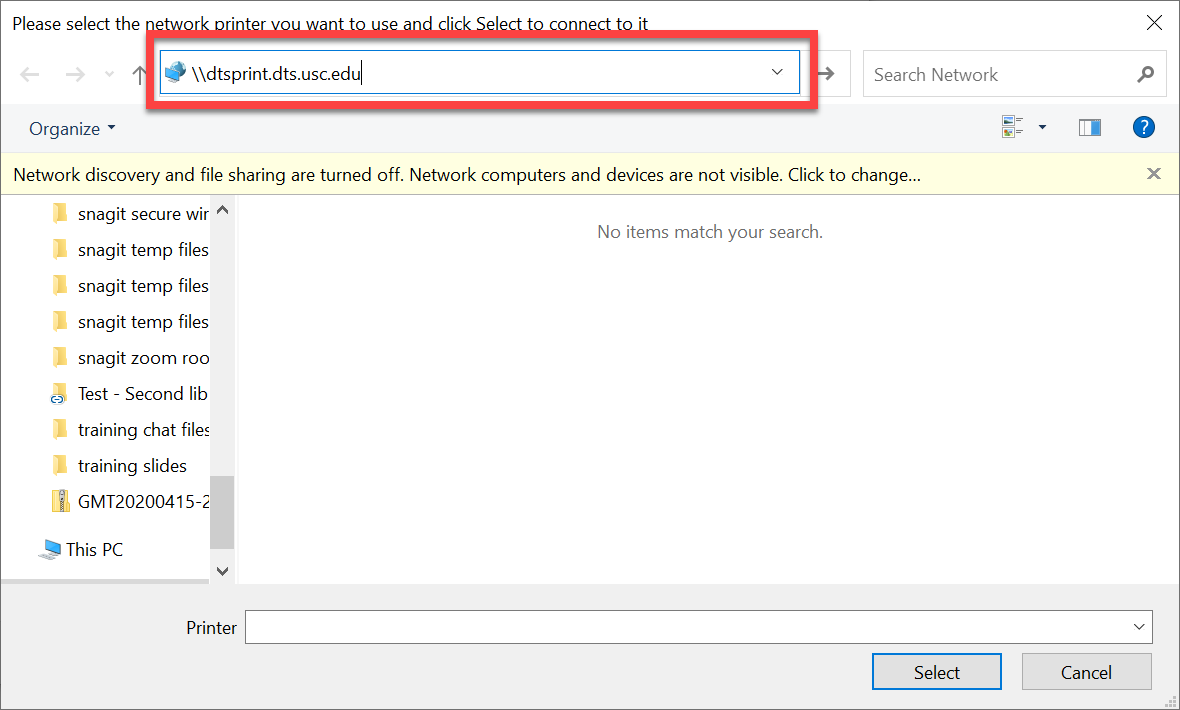
- Press Enter on your keyboard.
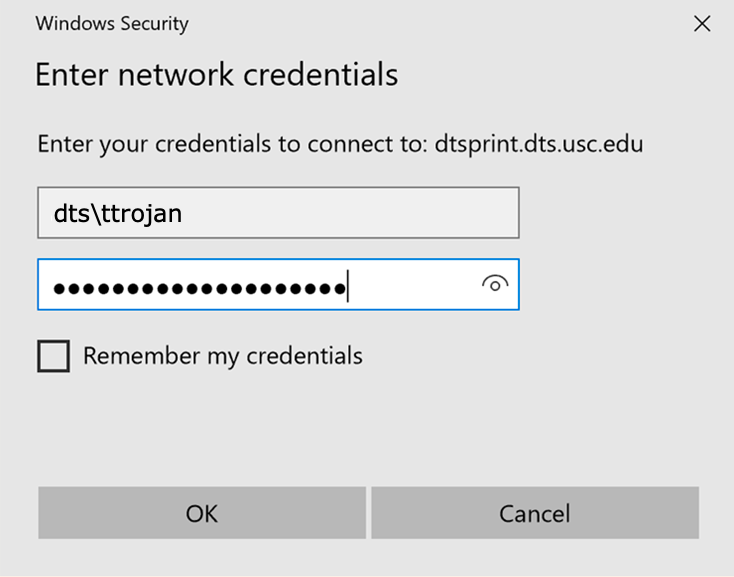
- When prompted, type in your credentials as follows and click OK:
- Username: dts\yourUSCNetID (e.g. if your email address is ttrojan@usc,edu, type dts\ttrojan)
- Password: Your USC NetID passphrase
- If you select the checkbox Remember my credentials, you won't have to input your credentials after this first time.
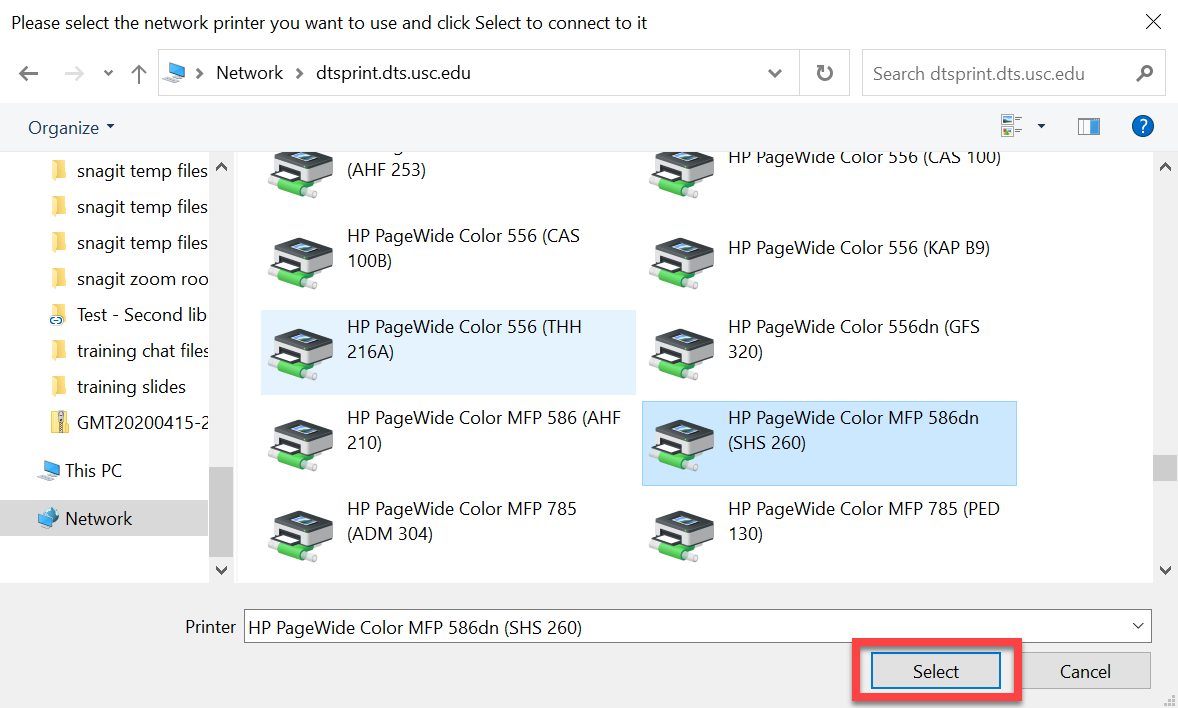
- The full list of Dornsife network printers loads. Click on your network printer to select it. Then, click Select.
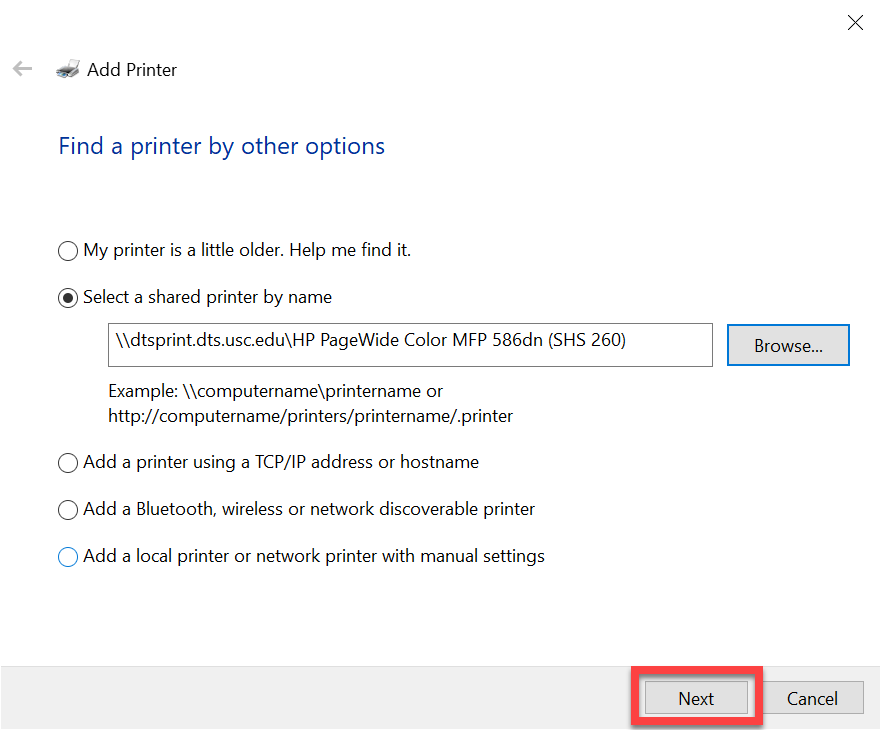
- Click Next.
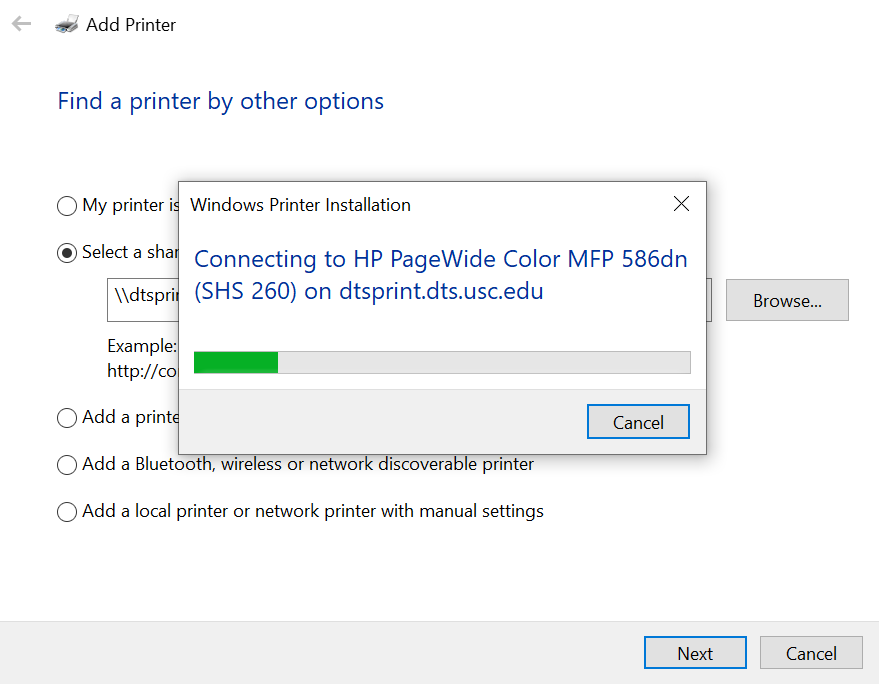
- Allow about 5–10 seconds for the printer to be added. Click Next.
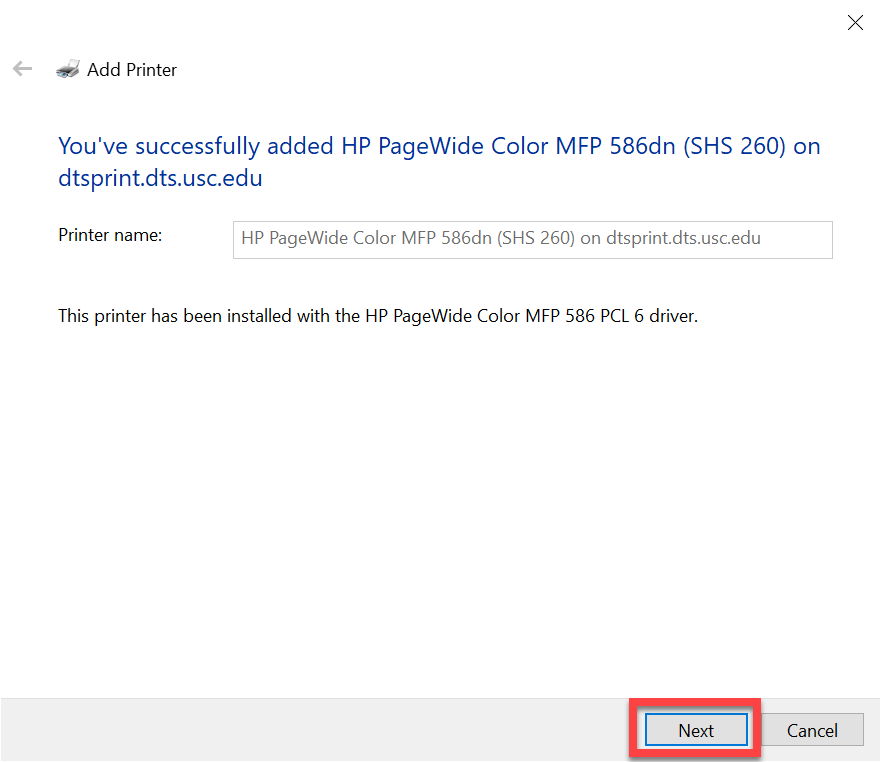
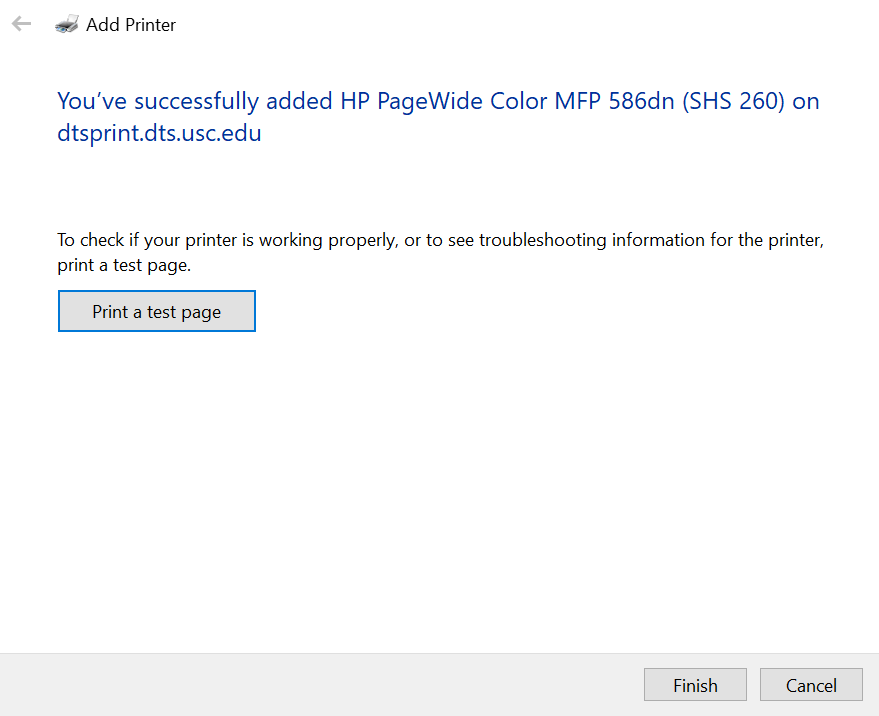
- Click Print a test page or Finish. You're all set!
Adding a Dornsife network printer to your Mac
The following steps apply to both Dornsife-managed Macs as well as personal Macs:
Quick guide
Step 1: Add the network printer to your Mac
- Make sure you're connected to the USC network via either Ethernet or USC Secure Wireless. (Do not use USC Guest Wireless.)
- Click on the Apple menu in the top left corner of your desktop, and select System Preferences from the dropdown.
- Click Printers & Scanners.
- Click the [+] icon.
- The full list of Dornsife network printers loads. To quickly find your network printer, type its name or location into the search bar.
- Click on the printer to select it. Make sure that the Use field auto-fills with "Secure AirPrint." (If "Secure AirPrint" does not appear in the Use field, wait a few minutes and then try clicking on the dropdown to see if it shows up.) Click Add.
- You're all set!
Step 2: Print to the network printer (first time)
The first time that you select this printer in Microsoft Word or any other program, you must input your USC NetID (aka what you use to log into Outlook, Workday, etc):
-
Name: Your USC NetID (e.g. if your email address is ttrojan@usc.edu, type ttrojan)
-
Password: Your USC NetID passphrase
If you select the checkbox Remember this password in my keychain, you won't have to input your credentials after this first time.
Adding a Dornsife network printer to your Linux computer
Below, we provide the steps for adding a Dornsife network printer to a computer running Ubuntu 64-bit. If you're using a different version of Linux, your screen may appear slightly different but the steps should remain the same.
Add a printer to your Linux computer
Quick guide
Step 1: Set the workgroup
- Make sure you're connected to the USC network via either Ethernet or USC Secure Wireless. (Do not use USC Guest Wireless.)
- Open Terminal.
- Execute the following commands:
-
Install SMB client: sudo apt-get install smbclient
-
Install Samba: sudo apt-get install samba
-
Install Python: sudo apt-get install python-smbc python3-smbc
- Next, you will need to edit the SMB file to include the appropriate workgroup:
- Execute the following command: sudo nano /etc/samba/smb.conf
- Scroll down to Global Settings.
- In the workgroup field, delete WORKGROUP and replace it with DTS.USC.EDU
- Press Ctrl and X on your keyboard simultaneously to save the edited file.
- When "Save modified buffer?" appears at the bottom of the terminal command, press Y on your keyboard to confirm.
- When "File name to write: /etc/samba/smb.conf" appears, press the Enter key on your keyboard.
- Close Terminal.
Step 2: Add your network printer
- Open your Settings > Devices > Printers.
- Click Add a printer…
- If a "CUPS Printer" option appears, click on it.
- Click Add.
- Click Additional Printer Settings…
- Click + Add.
- In the left-side menu, click Network Printer to expand the list, and select Windows Printer via SAMBA.
- In the "smb://" field, type in dtsprint.dts.usc.edu
- Click Browse…
- Input your USC NetID credentials (aka what you use to log into Outlook, Workday, etc) and click OK:
- Username: Your USC NetID (e.g. ttrojan)
- Domain: DTS.USC.EDU
- Password: Your USC NetID passphrase
- The full list of Dornsife network printers loads. Click on a printer to select it, and click OK.
- Under "Authentication," click Set authentication details now. Input your USC NetID credentials and click on Forward:
- Password: Your USC NetID passphrase
- Username: Your USC NetID
- Click Generic. Click Forward.
- Under "Models," click PostScript. Make sure that, under "Drivers," Generic PostScript Printer Foomatic/Postscript [en] is selected. Click Forward.
- You can optionally name and describe the network printer that you are adding. Click Apply.
- Click Print Test Page. You're all set!
Detailed guide (with screenshots)
Step 1: Set the workgroup
- Make sure you're connected to the USC network via either Ethernet or USC Secure Wireless. (Do not use USC Guest Wireless.)
- Open Terminal.
- Execute the following commands:
-
Install SMB client: sudo apt-get install smbclient
-
Install Samba: sudo apt-get install samba
-
Install Python: sudo apt-get install python-smbc python3-smbc
- Next, you will need to edit the SMB file to include the appropriate workgroup:
- Execute the following command: sudo nano /etc/samba/smb.conf
- Scroll down to Global Settings.
- In the workgroup field, delete WORKGROUP and replace it with DTS.USC.EDU
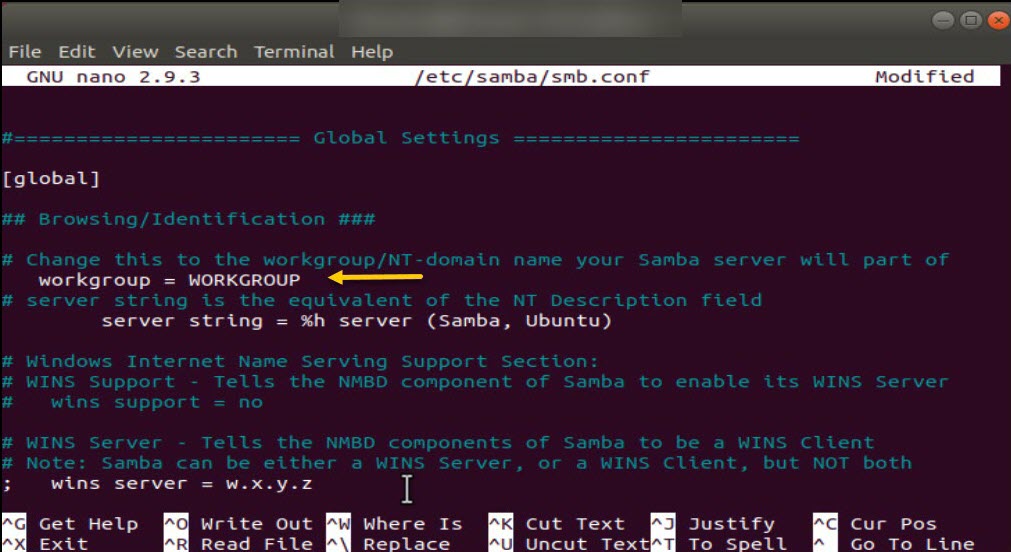
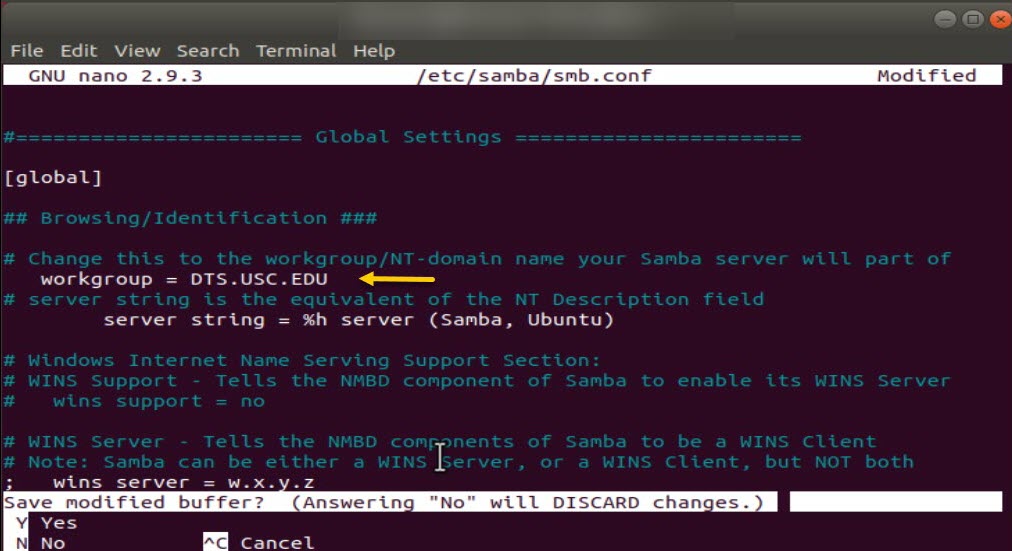
- Press Ctrl and X on your keyboard simultaneously to save the edited file.
- When "Save modified buffer?" appears at the bottom of the terminal command, press Y on your keyboard to confirm.
- When "File name to write: /etc/samba/smb.conf" appears, press the Enter key on your keyboard.
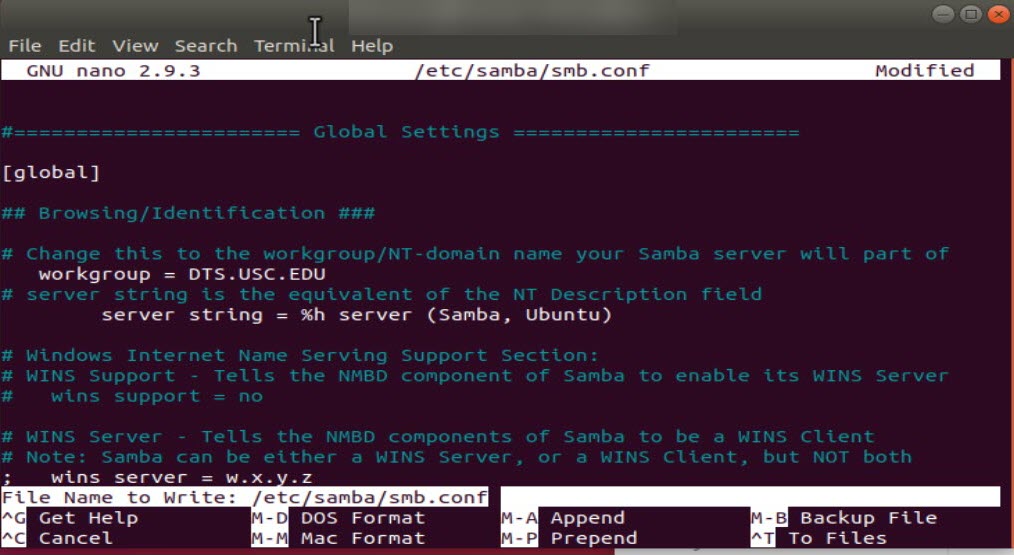
- Close Terminal.
Step 2: Add your network printer
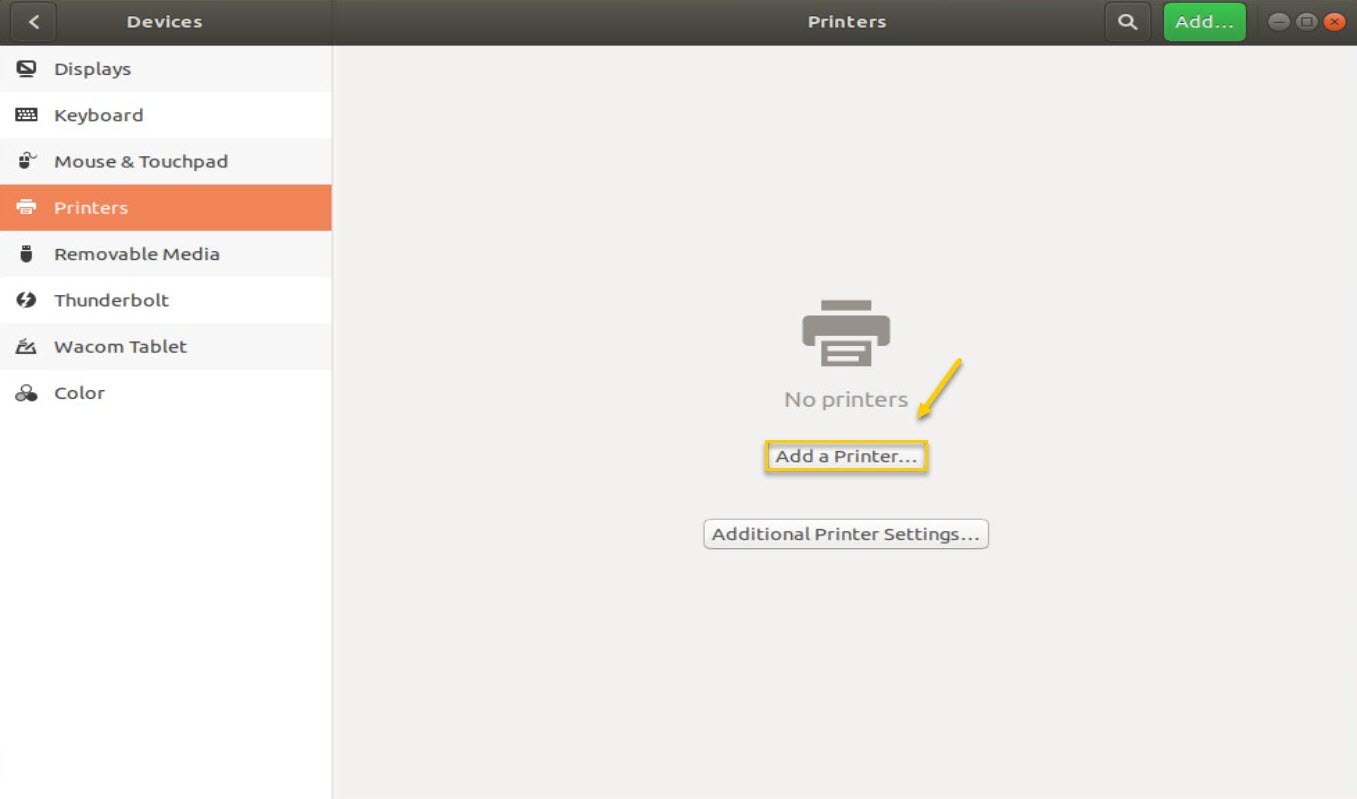
- Open your Settings > Devices > Printers.
- Click Add a printer…
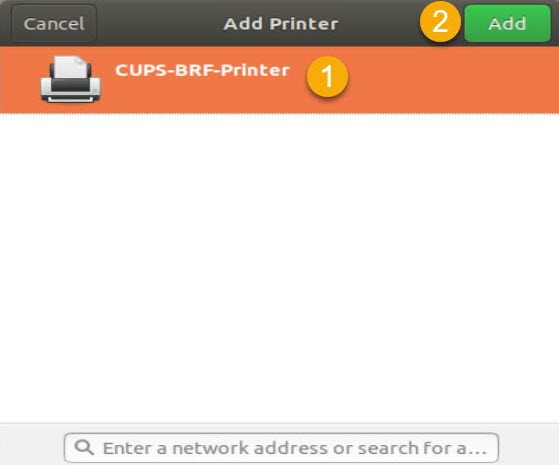
- If a "CUPS Printer" option appears, click on it.
- Click Add.
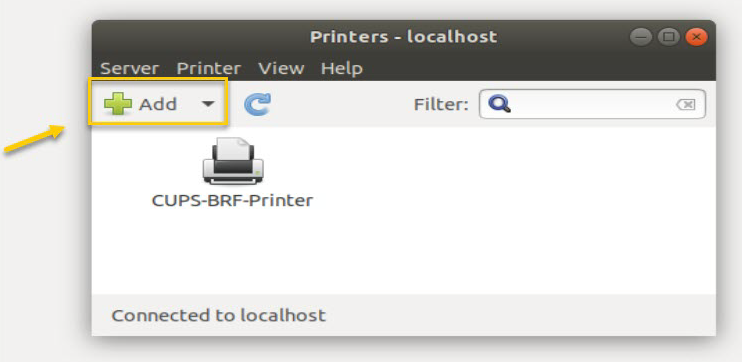
- Click Additional Printer Settings…

- Click + Add.
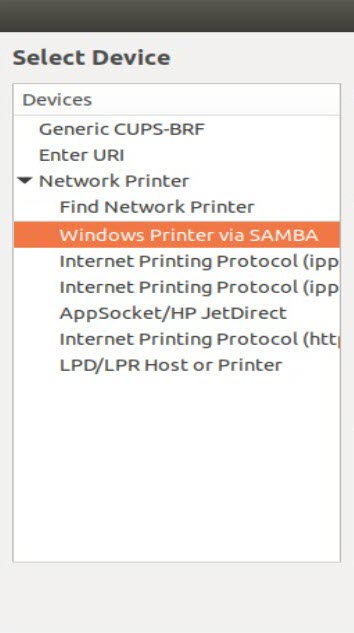
- In the left-side menu, click Network Printer to expand the list, and select Windows Printer via SAMBA.
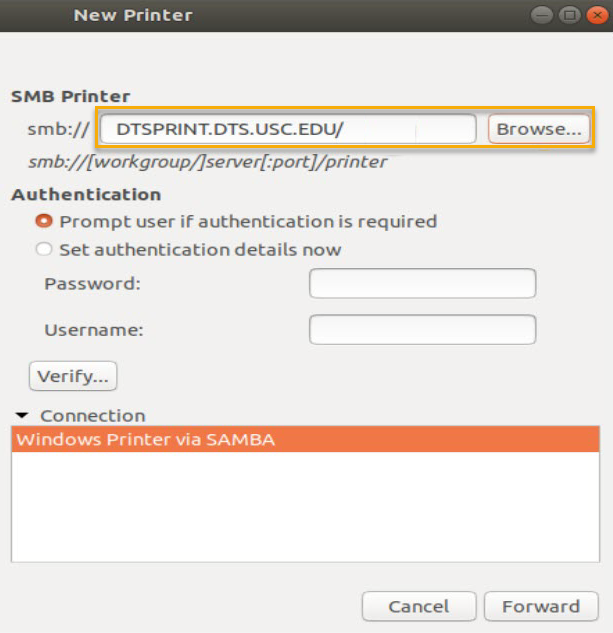
- In the "smb://" field, type in dtsprint.dts.usc.edu
- Click Browse…
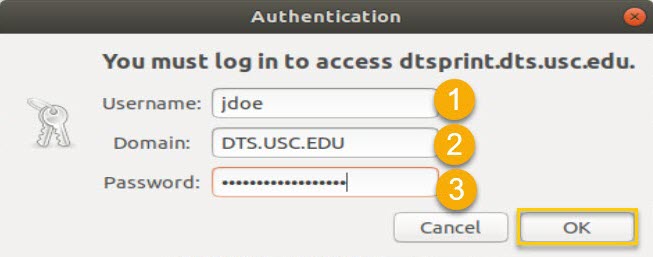
- Input your USC NetID credentials (aka what you use to log into Outlook, Workday, etc) and click OK:
- Username: Your USC NetID (e.g. ttrojan)
- Domain: DTS.USC.EDU
- Password: Your USC NetID passphrase
- The full list of Dornsife network printers loads. Click on a printer to select it, and click OK.
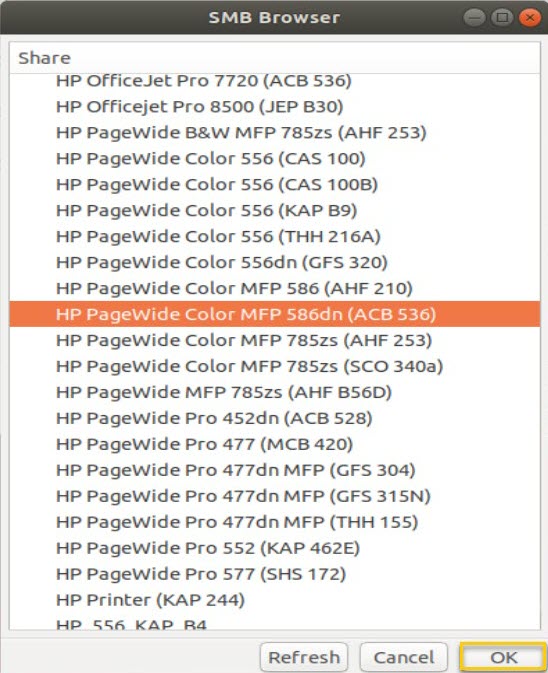
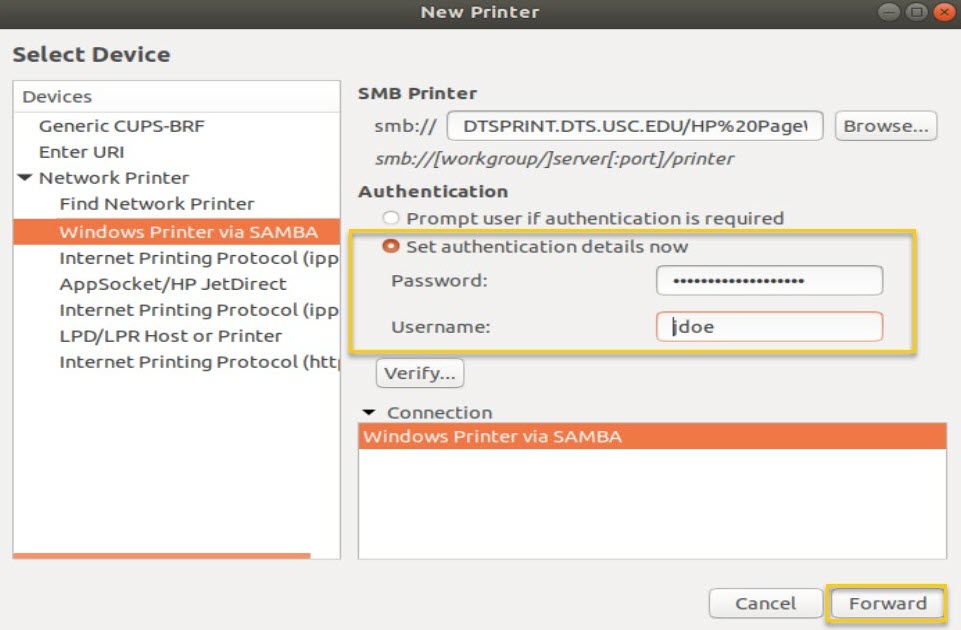
- Under "Authentication," click Set authentication details now. Input your USC NetID credentials and click Forward:
- Password: Your USC NetID passphrase
- Username: Your USC NetID
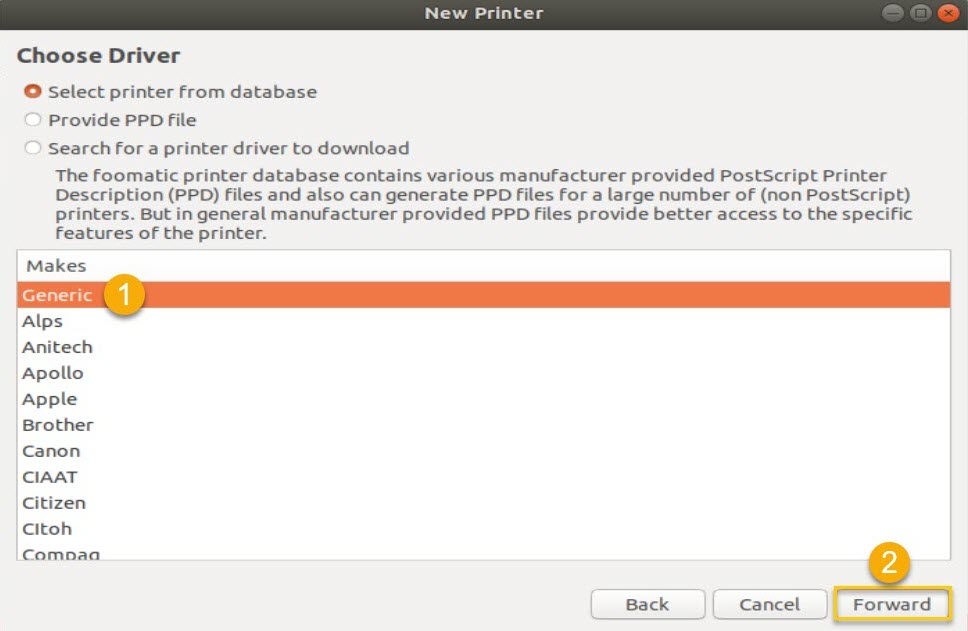
- Click Generic. Click Forward.
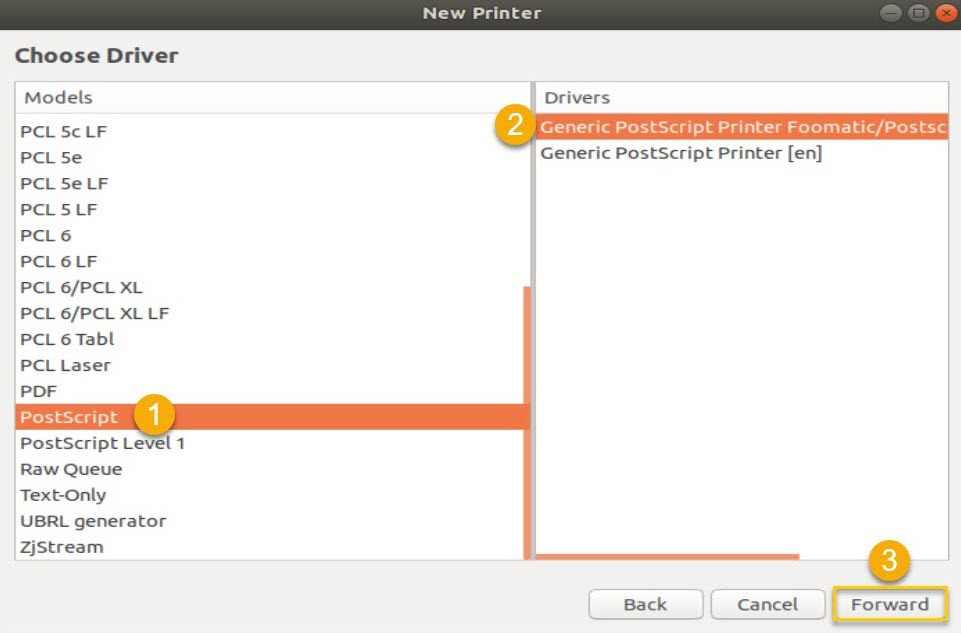
- Under "Models," click PostScript. Make sure that, under "Drivers," Generic PostScript Printer Foomatic/Postscript [en] is selected. Click Forward.
- You can optionally name and describe the network printer that you are adding. Click Apply.
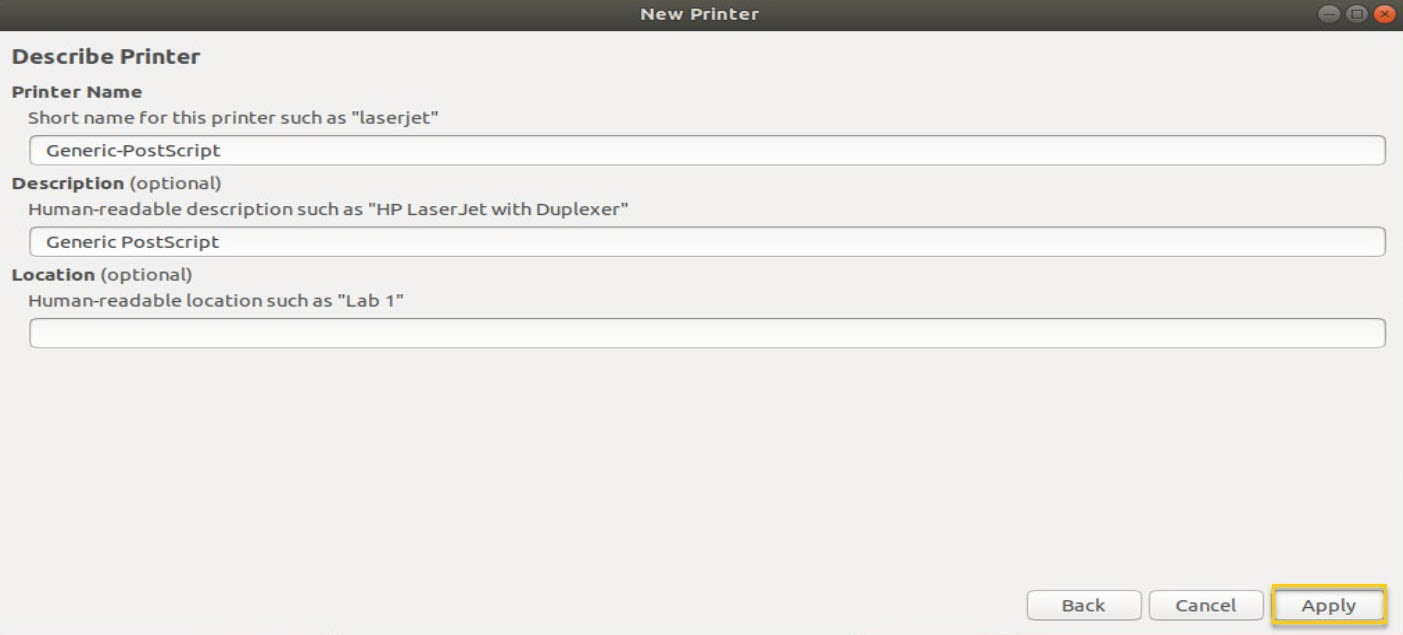
- Click Print Test Page. You're all set!

Removing a Dornsife network printer from your computer
If you ever need to remove a Dornsife network printer from your computer, you can follow the instructions below:
Remove the printer on a Windows PC
Quick guide
- In the Windows Start menu search bar, type printer
- Click Printers & scanners.
- Click on a network printer to select it.
- Click Remove device.
- When prompted, enter your computer login credentials and click Yes:
-
Personal Windows PCs
- Username and password that you set up for your computer
-
Dornsife-managed Windows PCs (Software Center)
- Username: USC NetID (e.g. if your email address is ttrojan@usc.edu, your username is ttrojan)
- Password: USC NetID passphrase
-
Dornsife-managed Windows PCs (Company Portal)
- Username: USCNetID@dts.usc.edu (e.g. if your email address is ttrojan@usc.edu, your username is ttrojan@dts.usc.edu)
- Password: USC NetID passphrase
- Click Yes.
- Restart your computer.
- Now you can add the printer again following our instructions above. (Note: on Dornsife-managed Windows PCs using Software Center, no further action is required on your part: the printer will automatically re-add itself to your computer.)
Detailed guide (with screenshots)
First, remove the printer
- In the Windows Start menu search bar, type printer

- Click Printers & scanners.

- Click a network printer to select it.
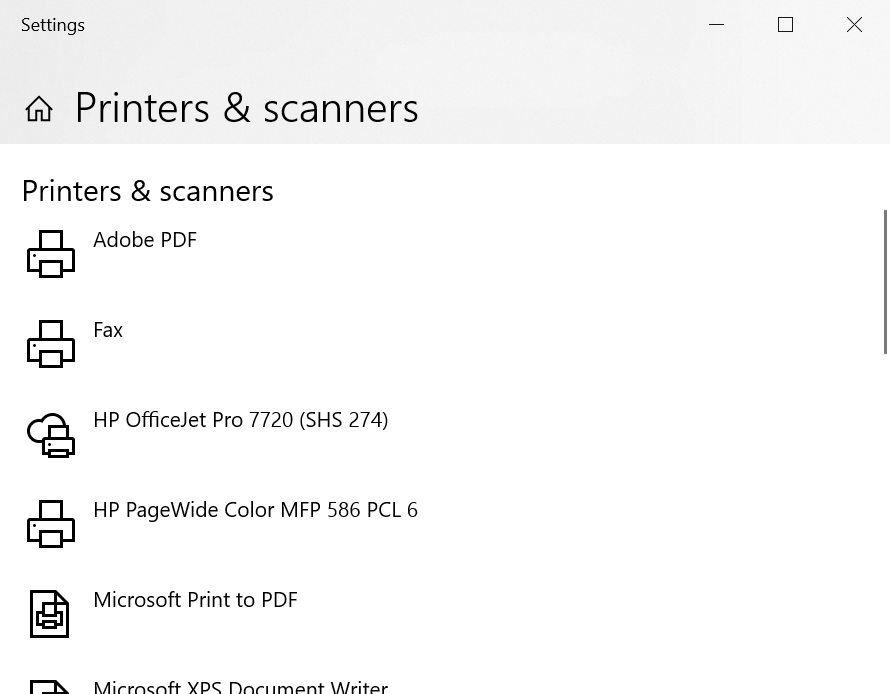
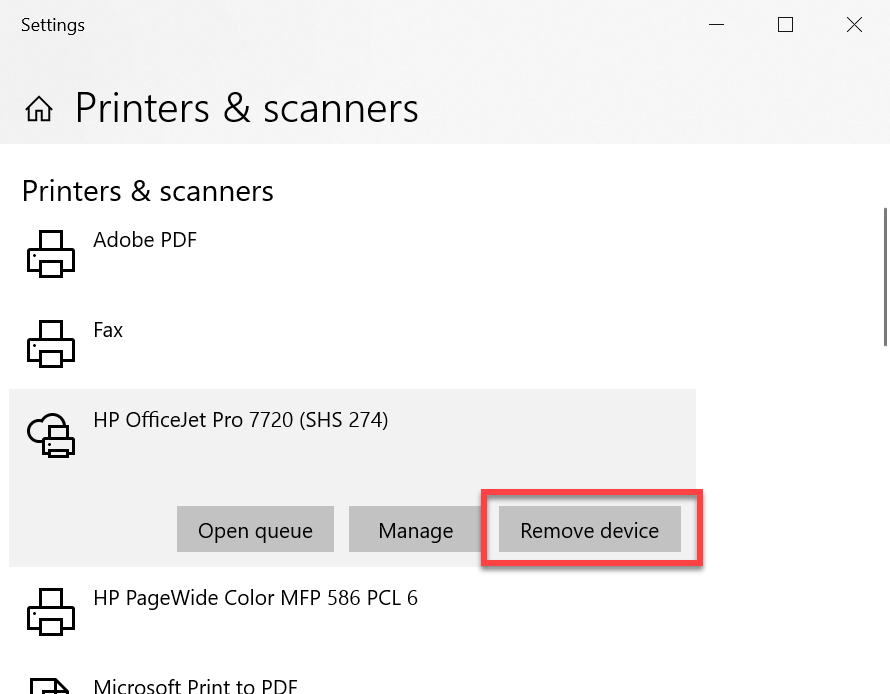
- Click Remove device.
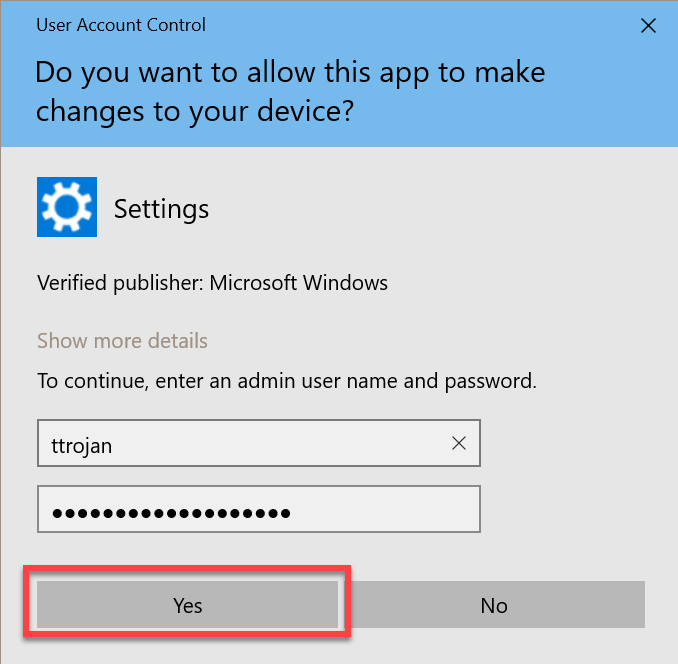
- When prompted, enter your computer login credentials and click Yes:
-
Personal Windows PCs
- Username and password that you set up for your computer
-
Dornsife-managed Windows PCs (Software Center)
- Username: USC NetID (e.g. if your email address is ttrojan@usc.edu, your username is ttrojan)
- Password: USC NetID passphrase
-
Dornsife-managed Windows PCs (Company Portal)
- Username: USCNetID@dts.usc.edu (e.g. if your email address is ttrojan@usc.edu, your username is ttrojan@dts.usc.edu)
- Password: USC NetID passphrase
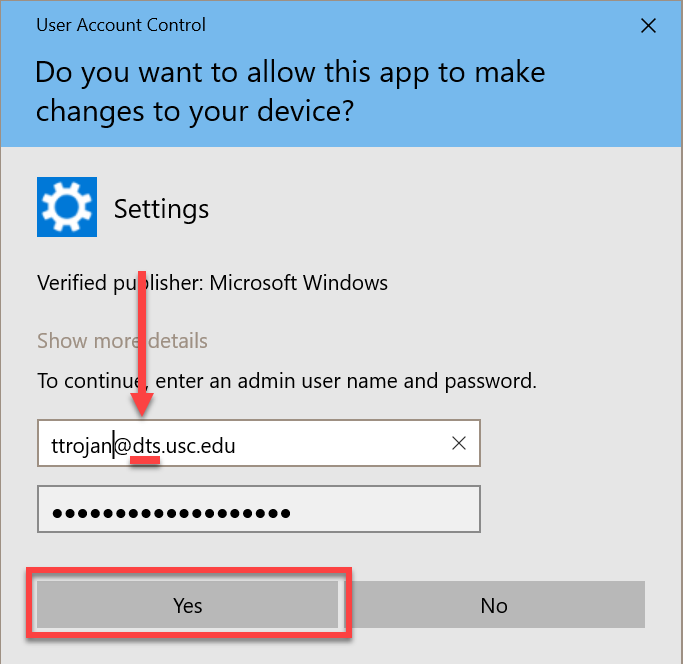
- Click Yes.
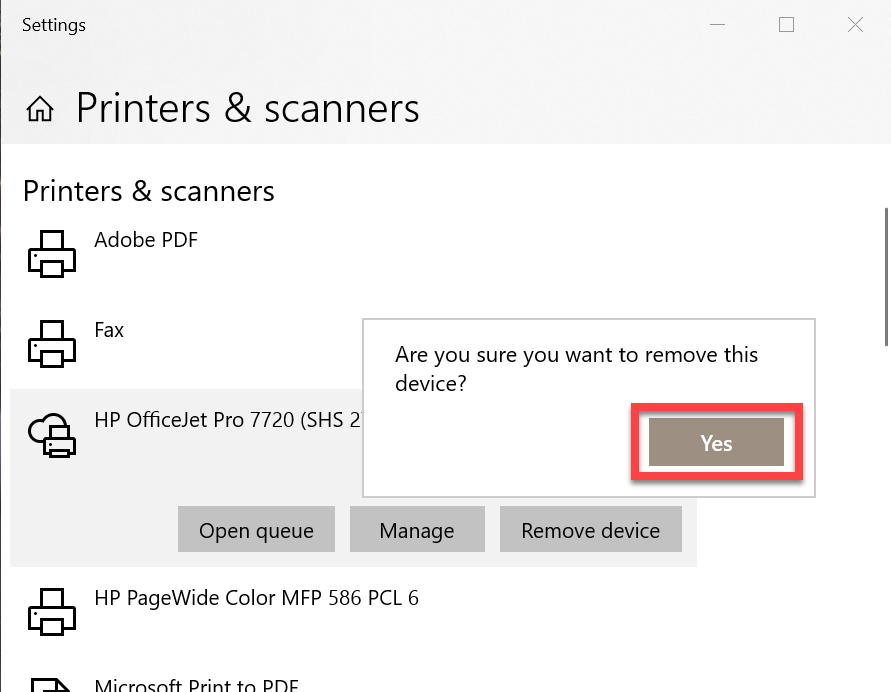
- Restart your computer.
- Now you can add the printer again following our instructions above. (Note: on Dornsife-managed Windows PCs using Software Center, no further action is required on your part: the printer will automatically re-add itself to your computer.)
Troubleshooting
If you can't print to the printer after adding it to your computer, follow our instructions for using Web Print instead:
Computer-related errors
If you are able to print successfully using Web Print, the issue is most likely with your computer rather than the printer itself. Try the following suggestions:
- Restart your computer and try printing again
- If you recently changed your USC NetID passphrase, you may need to update the password saved on your computer:
Update your passphrase on a Windows PC
If you are using a personal Windows PC, you can either remove the saved passphrase in Credential Manager or follow our instructions above for removing and re-adding the printer to your computer.
If you are using a Dornsife-managed Windows PC, your computer automatically updates when you change your passphrase.
- If you haven't changed your USC NetID passphrase recently, you may need to remove and re-add the printer to your computer (see our instructions above)
Printer-related errors
If you are unable to print using Web Print, the issue may be with the printer itself—especially if others are also having trouble printing to it. If restarting the printer doesn't resolve the issue, please get in touch with us directly by submitting a ticket to the DTS Help Desk, and one of our technicians will investigate the issue further.
Additional contributor(s): Richard Herrera, Jerry Word.